

Shortlink of this post – http://wp.me/PrgSo-gQ (use this URL when linking to this page in your Facebook/forums/twitter/IRC/BBS messages)
Alternative reading: same configuration with this page using MPC-HC – click here.
TABLE OF CONTENTS
CHANGELOG
21 September 2014 – Modified slightly the CUVID decoding method below to include the HEVC hybrid decoding method.
Also included: A detailed QuickSync headless mode setup. You do not need this if you use Windows 8 and has installed the latest drivers.
From 12 May 2014, the installer will always reset the PotPlayer settings. Existing users that want to retain their custom settings should make a back-up of their default preset by opening the ‘Preferences’ window (F5) and clicking the ‘Export Presets (S)’ button as shown below.

Introduction
When I first wrote the KMPlayer guide available in archive mode here, it was meant to be an alternative to MPC-HC to watch fansubbed anime episodes, with soft subtitles and with GPU acceleration (general DXVA, Intel-specific and CUDA method). But after KMPlayer being sold to pandora.tv, the development has slowed down considerably. The original developer of KMPlayer then moved on, and created a new media player called PotPlayer, which will be used in this guide. Compared to KMPlayer, PotPlayer has a more rapid development cycle, with more new features being added now and then. PotPlayer used to be unusuable for watching fansubbed anime with soft-subtitles, but as of today PotPlayer is more than capable to replace MPC-HC for watching such videos.
What you can expect in this page:-
- Use madVR in all playback scenarios. No more being shackled to certain renderers like VMR9 renderless or EVR custom presenter for DXVA. No more compromise with image quality.
- Be able to use DXVA renderless method even with madVR. You cannot do that with MPC-HC. Intel, ATI and nVidia GPUs are supported. CUDA decoding method are also supported in this page of course.
- Not only that you can use DXVA with madVR, post-processing methods like deband also works here, with ffdshow raw video filter. Deinterlacing is now done on decoder level.
- If hardware-accelerated video playback isn’t your thing, I will also show you how to configure PotPlayer for high-performance software decoding (for both H.264 and DivX/XviD videos) with LAV Video Decoder, which is reasonably fast and has better support for 9-bit and 10-bit H.264 videos too than ffdshow video decoder.
The main drawback for this guide is that the renderless DXVA method is usable only in Windows Vista and 7. Windows XP users are out of luck, unless you go with CUDA playback method or software decoding playback method. Another drawback of switching from MPC-HC to PotPlayer is that you have to re-learn everything. Keyboard shortcuts for common functions between these two players are completely different. In MPC-HC, the keyboard shortcut for full-screen playback is ‘Alt-Enter’ combo buttons, while for PotPlayer, it is simply the ‘Enter’ button. In MPC-HC, switching chapters can be done with the ‘PgUp’ and ‘PgDn’ buttons, while in PotPlayer, the same thing can be done with ‘Shift-PgUp’ or ‘Shift-PgDn’ combo buttons.
Supported hardware
Updated January 2018 - With the advent of 4K UHD HDR displays, UHD discs now rippable, madVR removing NNEDI3 from image upscaling section and SPECTRE + MELTDOWN fiasco, there is only one hardware combination that you should get, which is AMD Ryzen systems with nVidia GPUs.
Recommended baseline CPU: AMD Ryzen 5 1600X Processor (YD160XBCAEWOF).
Recommended Motherboard: ASRock X370 TAICHI Socket AM4/AMD X370/DDR4/Quad CrossFireX & SLI/SATA3&USB3.1/M.2/Wi-Fi/A&GbE/ATX Motherboard.
It is really hard for you to go wrong with these two, especially when playing 4K HEVC 10-bit videos in software mode using LAV Video Decoder 64-bit. No Intel until maybe three to five years from now.
As for GPUs, it depends whether you have a 4K display or not. Now assuming that you want a 4K display right now that is capable of HDR for watching videos, I suggest that you do not bother with 4K HDR computer monitors, and go straight to a big 4K UHD TV.
Example 4K UHD TV: LG Electronics OLED55E7P 55-Inch 4K Ultra HD Smart OLED TV (2017 Model).
The TV above is 55", 4K resolution and has HDR too. The size means you do not have to change Windows scaling to have a usable desktop.
GPU recommendation (high-end - 4K HDR display or not): ZOTAC GeForce GTX 1080 Ti AMP Edition 11GB GDDR5X 352-bit PCIe 3.0 Gaming Graphics Card VR Ready(ZT-P10810D-10P).
Regardless whether you have a 4K display or not, the best nVidia GPU recommended is a GTX 1080Ti like the one above. It supports HEVC 10-bit and VP9 hardware video decoding, and does HDR passthrough really well. Can really handle NGU in madVR to as long as you don't go overboard.
GPU recommendation (low-end - 4K HDR display): ZOTAC GeForce GTX 1050 Ti OC Edition 4GB GDDR5 Super Compact Gaming Graphics Card (ZT-P10510B-10L).
GPU recommendation (low-end - non-4K display or 4K non-HDR display ): ZOTAC GeForce GTX 1060 Mini, ZT-P10600A-10L, 6GB GDDR5 Super Compact VR Ready Gaming Graphics Card.
The GPU for displays not capable of HDR (GTX 1060) is more powerful than GPU for 4K HDR displays (GTX 1050Ti) because converting HDR to SDR via pixel shader operations is a quite costly operation in term of GPUI resources. These two can handle all relevant video codecs, but if you have a 4K display, you should choose the bottom-most madVR preset in the installer.
Lastly, try and get Windows 8.1 instead of Windows 10 or Windows 7.
Software Checklist
- DirectX End-user Runtime June 2010 – This is a mandatory installation. You can install this via the LAV Filter Megamix installer below (requires a working Internet connection). If you already have it (some games installs it for you) then there is no need to redownload it again.
- Windows 7 SP1 Platform Update – Download here. For Windows 7 users, this package needs to be installed to use DirectX 11 features in madVR. Also can be installed via Windows Update (KB2670838).
- LAV Filters Megamix – Download the 64-bit version. (Compile time: 9 July 2026. Build: ab7ca6d. Changes: Updated LAV Filters and PotPlayer builds
).
- Contains PotPlayer (and MPC-HC + MPDN), LAV Filters, madVR, AssFilterMod, XySubFilter and DirectVobSub xy-vsfilter (disabled by default). doom9 thread for LAV Filters, doom9 thread for madVR, doom9 thread for XySubFilter + xy-vsfilter, doom9 thread forAssFilterMod.
Programs for troubleshooting purposes:-
- DXVA Checker – Download latest version here.
- GPU-Z – Shows you detailed information about your GPU. Download latest version here.
- CPU-Z – Shows you detailed information about your CPU. Download latest version here.
- Driver Sweeper – Remove remnants of ATI/nVidia drivers in your system after installation. Download it here.
Test videos:-
- H.264 SD video clip with styled karaoke subtitles [MediaInfo] – The Melancholy of Haruhi Suzumiya NCED theme (Hare Hare Yukai) – download here.
- H.264 720p video clip with styled karaoke subtitles [MediaInfo] – Clannad NCED theme (Dango Daikazoku) – download here.
- H.264 1080p video clip with styled karaoke subtitles [MediaInfo] – AIR NCOP theme (Tori no Uta) – download here.
- H.264 1080p video clip with styled karaoke subtitles [MediaInfo] – Clannad After Story NCOP theme (Toki wo Kizamu Uta) – download here.
- H.264 1080p video clip with styled subtitles [MediaInfo] – Planet Earth: From Pole to Pole
– download here.
- Optional test file for testing deinterlacing capabilities: H.264 1080i video clip [MediaInfo] – History Channel – Decoding the Past: Mysteries of the Freemasons
– download here.
- Optional test file for testing splitter’s segment linking capabilities: 3x H.264 anamorphic 1080p video clips with styled subtitles [MediaInfo] – K-On!! episode 6 – download here.
- Optional test file to test H264 4K playback and scaling performance: 8-bit H.264 video clip with 125Mb bitrate [MediaInfo] 4k UDHTV LG Demo video – download here.
- Optional (animation) test file to test Hi10p decoding performance: H.264 1080p 10-bit video clip (no subtitles) [MediaInfo] Sentai Filmworks’ Angel Beats trailer – download here.
2-pass encode with 10000Kbps bit-rate, 16 reference frames and 8 b-frames. Visually lossless compared to the source Blu-ray, even with 50% size reduction. If you can play this file flawlessly, your system should be good enough to play 99.999% Hi10p videos that anime fansubs groups will encode in the future. Even Tenshi’s encodes. - Optional (real-life) test file to demonstrate Hi10p encoding efficiency: H.264 1080p 10-bit video clip (PGS subtitles) [MediaInfo] – Pirates of the Caribbean: At World’s End blooper reel – download here.
2-pass encode with saner settings: 3072Kbps bit-rate, 3 reference frames, 3 b-frames. Differences in visual quality between the encoded file and the source Blu-ray is pretty much negligible. This clip is more than 3 times longer than the Highschool of the Dead clip above, yet the differences in size is merely only 20MB. A massive 80% file reduction has been achieved from the source file, with no 80% quality reduction, or any need to downscale to lower resolutions either. - Optional test file to test HEVC 4K playback and scaling performance: 10-bit H.265 video clip (no subtites) [MediaInfo] Samsung SUHD demo video – Colorful Food – download here.
If you have any problems downloading the files, please make a comment below.
The Guide Itself
Jump to:-
STEP 1 – Installation Stage
STEP 2 – Choosing Your Preferred Decoding Method By Configuring LAV Video Decoder
STEP 3 – Configuring LAV Splitter Source, LAV Audio Decoder and AC3Filter (optional)
STEP 4 – madVR
Download the LAV Filters Megamix above, and install it. Make sure you do not forgot to select PotPlayer in the screen below.
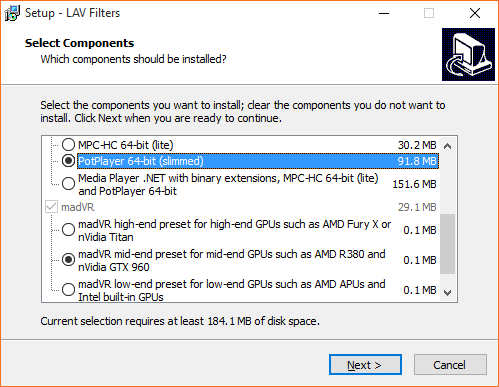
First, select ‘PotPlayer’ as the player option, then select a madVR profile that fits your preferences and GPU profile. If you enabled the ‘H.264 MVC 3D Decoder (extra download)’ option, you will need a working Internet connection to complete the installation process.
You will still need to go to madVR settings page and configure your display’s characteristics (‘devices —> ‘your-display-name-here’).
PotPlayer can now be started via ‘All Programs —> LAV Filters —> PotPlayer’. Using Windows 8? It should be available somewhere in the Start Screen.
Step 2 –Choosing Your Preferred Decoding Method By Configuring LAV Video Decoder
It will be here where you will have to decide which decoding method from the list below that you want to use:-
- High performance software decoding mode.
- DXVA renderless decoding mode.
- CUDA decoding mode.
- Intel QuickSync decoding mode.
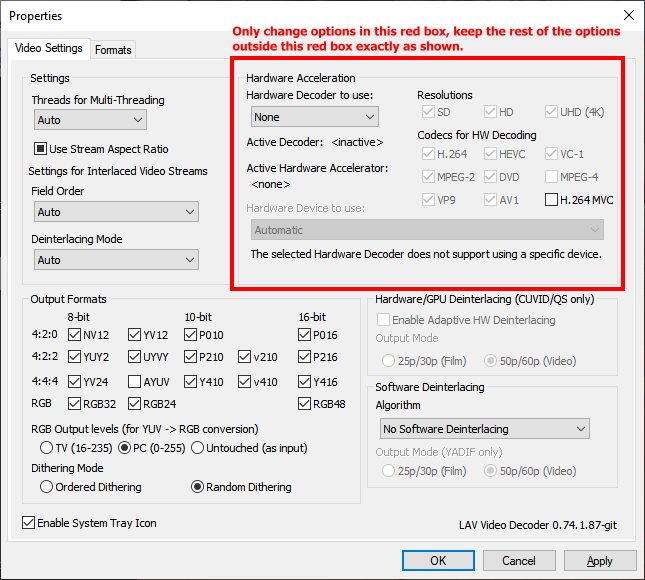
Go to ‘Start Menu —> All Programs —> LAV Filters —> LAV Video Configuration’ to bring up LAV Video Decoder property page. For Windows 8 users, the shortcut should be somewhere in the Metro Start page. LAV Video Decoder property page will appear and ready to be configured according to your preferred decoding method.
Method #1 – High performance software decoding mode.
For best results, you need a fast dual-core CPU with minimum speed of 3Ghz. A quad-core CPU should at least have 2.5Ghz of speed at least. Read the Hi10p footnote below for more information.

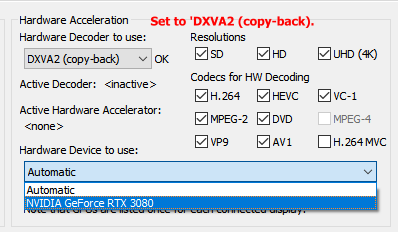
Method #2 – DXVA renderless decoding mode.
Can only be used in Windows Vista and 7. Works best with nVidia GPUs, and also ATI GPU series that has UVD3. ATI UVD2.x users may have to switch to EVR custom presenter. Doesn’t work on Hi10p videos and other unsupported video formats, and will fall into high performance software decoding mode when such files are played.
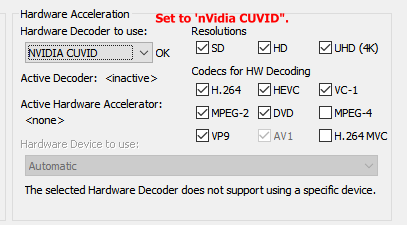
Method #3 – CUDA decoding mode (nVidia GPUs only).
note: Must use driver version 340.52, if your GPU is supported, if you want HEV hybrid decoding support.
Doesn’t work on H.264 Hi10p videos and other unsupported video formats, and will fall into high performance software decoding mode when such files are played. Windows 10 users should avoid this method, and instead should use the DXVA renderless method above.
Method #4 – Intel QuickSync Decoding Mode.
You need an Intel SandyBridge/IvyBridge CPU that use the LGA1155 socket and a motherboard that did not use the P67 chipset. Therefore only motherboards with the B65, H61, Q67, H67, and Z68 chipsets can be used. All Series 7 motherboard chipsets will work. Windows 7 and later is recommended. Windows Vista is discouraged (no heterogenous GPU support), and Windows XP isn’t supported at all.
If you want to use QuickSync ASIC for decoding while using a discrete videocard for madVR, you will need Windows 7 or later. If you only have Windows 7, you need to enable the QuickSync headless mode by following the steps in this link. If you have Windows 8, you do not have to do so.
Always make sure that you are using the latest drivers available from Intel’s website, not the ones that comes from the motherboard manufacturer’ websites, or the CD. Older driver versions may cause the decoder to fail.

Method #5 – native DXVA decoding mode.
Works only in Windows Vista and later. Should only be used by owners of Intel G45 chipset, Clarkdale and Arrandale CPUs, ATI HD3xxx, HD4xxx and HD5xxx GPUs. But all other GPUs/iGPUs that can use QuickSync/CUVID/DXVA renderless decoding methods should also be able to use this mode. Doesn’t work on Hi10p videos and other unsupported video formats, and will fall into high performance software decoding mode when such files are played.
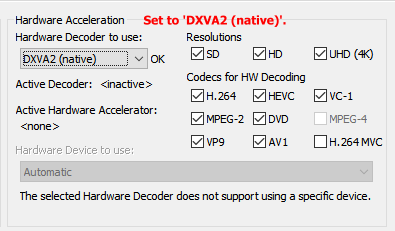
Click ‘Apply’ button to save your settings, then click the ‘OK’ button to close the property page.
Step 3 –Configuring LAV Splitter Source, LAV Audio Decoder and AC3Filter (optional)
Go to ‘Start Menu —> All Programs —> LAV Filters —> LAV Splitter Configuration’ to bring up LAV Splitter property page. For Windows 8 users, the shortcut should be somewhere in the Metro Start page. ‘LAV Splitter’ property page will appear below.

Leave everything here exactly as shown above. You’re welcome to play around with automatic audio/subtitles track selection routine though to suit your needs. Verify that everything is in order, click ‘Apply’ and then click ‘OK’ to close the property page.
Go to ‘Start Menu —> All Programs —> LAV Filters —> LAV Audio Configuration’ to bring up LAV Audio Decoder property page. For Windows 8 users, the shortcut should be somewhere in the Metro Start page. ‘LAV Audio Decoder’ property page will appear below.
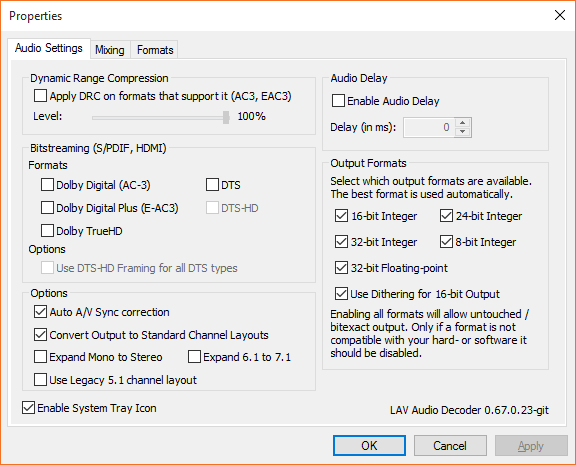
Enable any audio codec you want to bitstream here. Verify that everything is in order, click ‘Apply’ and then click ‘OK’ to close the property page.
Click here to read how to configure madVR.
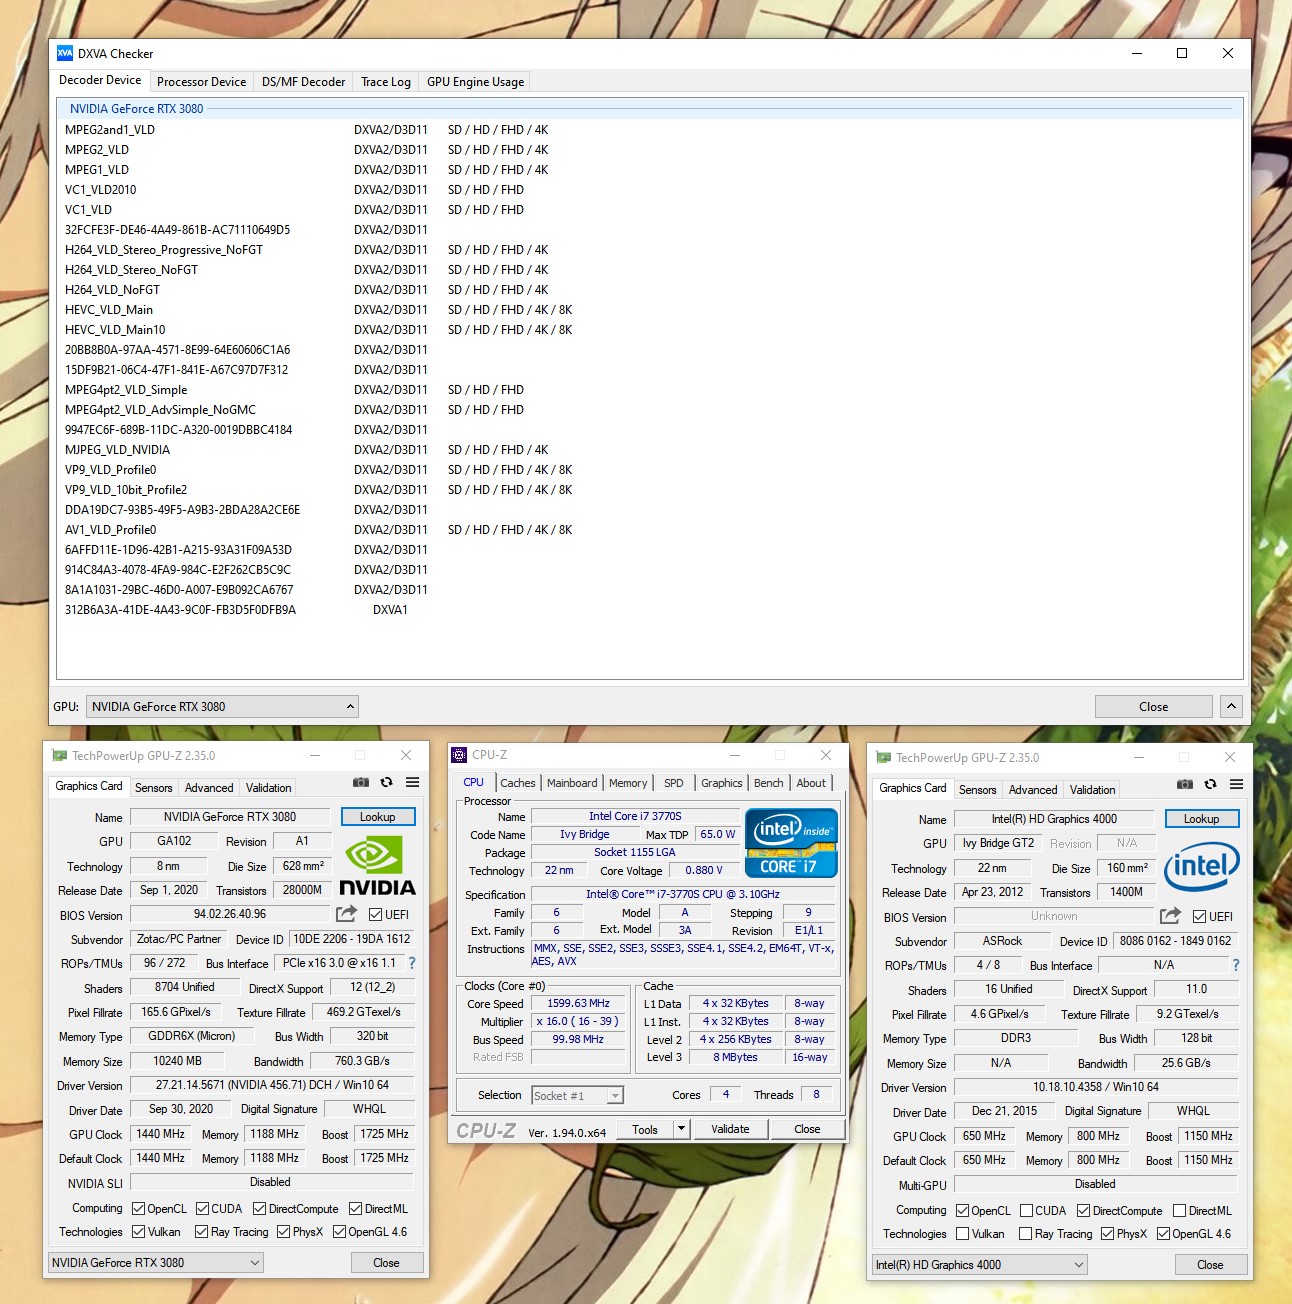
If you have any problems, make a comment below, with the screenshots of your DXVA Checker, GPU-Z and CPU-Z results like in the example below.
Notes about Hi10p MPEG4-AVC 10-bit decoding.
Tips on improving performance:-
- LAVFilters made available here are updated at least once every couple of days (or at least when there are commits). Try updating your installation regularly to get more performance improvements.
- Try using madVR in exclusive mode + new rendering path turned on + all three options for the new rendering path also turned on + use 16 framebuffers + all flushing options disabled.
- Don’t use ffdshow raw video filter during playback (you then have to hope that the encoders do the deinterlacing and deband) so that dithering will only be done on the GPU with madVR.
- PotPlayer-specific: Don’t use fancy skins like the one I made available above; those kind of skins do take resources too. Especially when that spectrum equalizer is being shown.
- When push come to shove, change your video renderer to EVR custom presenter to reduce more CPU usage.
If you can play this test video I made available above flawlessly, you should not have any problems playing any Hi10p videos that anime fansub groups may encode in the future, which is highly likely are less demanding than the referenced video.
CPU commentary:-
After a few days of testing MPEG4-AVC Hi10p playback on various systems using LAV Video Decoder with the two test files I have made available above and also Coalgirls Yuru Yuri episode 4 which is in 720p, here are my findings:-
AMD:
Dual-core CPUs from AMD like AMD Athlon II X2 (one clocked at 3Ghz, another at 2.8Ghz) have problems playing Hi10p 1080p videos like the two test files I have made available above. In fact, even a Phenom II X2 CPU at 3Ghz has problems with them. And so is the single Brazos E-350 laptop I tested. All of those systems I mentioned have their CPU utilization pegged at 100% and will drop frames in fast scenes in the HotD sequence.
The Yuru Yuri video doesn’t pose a problem with them though. Two desktop computers with an AMD Athlon II X4 2.6Ghz and another with a Phenom II X6 2.8Ghz doesn’t have any performance problems whatsoever with any of the files I used.
Recommendation, in order of preference:-
- Any quad core or higher, from either the Phenom II, Athlon II or Llano A6/A8 CPU line. Personally, I have just upgraded to an Athlon II X4 640 3Ghz CPU (no need for me to change motherboard) and it works well.
- One of those tri-core Athlon II/Phenom II/Llano A6 CPUs. Some of them can be unlocked too with the right motherboard.
- For laptop: Any of the models that has Llano quad-core parts.
- Those early Phenom quad-core CPUs available in Socket AM2 format.
- Very high-clocked dual-core CPUs, like Athlon II X2 275.
Not recommended:-
- Any Sempron CPUs.
- CPUs from the K8 family and older.
- The brand new Brazos Zacate laptop, or almost all of the current mobile parts from the Bobcat CPU family. Those processors depends heavily on GPU acceleration for high-definition video playback.
Intel:
Dual-core CPUs from Intel are more tolerant with those two 1080p Hi10p files I used. The CPU usage is quite high, up until 70%-80% but I have not noticed any frame drops problems. CPU tested includes Core i3 530 (2.9Ghz), Core i3 650 (3.3Ghz) and Pentium G6950 (2.8Ghz). Seeing this, I don’t even bother testing any of the Intel quad-core CPUs or the Sandy Bridge dual-core systems. I think if your motherboard has Socket 1366/1156/1155, any CPU (that doesn’t have ‘Celeron’ in its name) that fits into it should have no problems with Hi10p videos. I think the same can also be said for Arrandale or Sandy Bridge laptops as long as the CPU clock is at least 2Ghz.
Recommendation, in order of preference:-
- Any of those Nehalem/Sandy Bridge/Ivy Bridge quad-core (or higher) CPUs.
- Any dual-core CPUs from the Nehalem/Sandy Bridge/ Ivy Bridge series.
- Core 2 Quad CPUs for Socket 775.
- Some of the last-generation processors for Socket 775 like Core 2 Duo CPUs with minimum clock speed of 2.5Ghz.
Not recommended:-
- Any CPUs from generations older than Core 2 series.
- Intel Atom.
- Celerons.
Shortlink: http://wp.me/PrgSo-gQ


Hi Ranpha,
Updated after almost a year, after installing the latest version with rx6600 preset. HDR passthrough doesnt seem to trigger. the video plays washed out. the previous version i used triggered the TV HDR when i switched to fullscreen. Newversion is not doing that. Any idea on how to fix this?
Have you enabled the ‘send HDR metadata to the display’ option? Seems to be working here in Windows 11.
yes its on. i am on win10. with passthrough, colors are washed even if i enable HDR from windows setting. it only works if i select remap with pixel shaders and enable hdr from windows settings
In ‘devices —> display-name —> identification’ section, what does the hdr format field say? Also, what will happen if you choose ‘let madVR decide’?
it says st-2084,hlg. if i select let madvr decide, colors are not washed out but tv hdr is not activating
Can you download this file and see if the video also fail with HDR switching in passthrough mode or not?
still fails to activate HDR. if i manually enable hdr from windows the video goes from washed out to reddish color
another thing i noticed, with let madvr decide and windows HDR on, with fullscreen color is washed but on wimdowed mode color is vibrant. also in fullscreen, when i hover at the edge to show playback controls, video is also vibrant. this is the exact opposite of what happened previously. HDR was on in fullscreen and color was dul when i hovered to show bottom controls.
Did you happen to have fullscreen exclusive mode enabled?
no, enable automatic exclusive fullscreen is turned off in general settings
Also check that in PotPlayer Video section, exclusive mode isn’t enabled.
If this also failed, you may have to use pixel shader HDR then. Go to ‘rendering —> trade quality for performance’ section and enable all three of the HDR option there, before using the pixel shader option.
I am trying to fine tune my HTPC Nvidia RTX5070 Denon x4700H to LG C5 for 1080/4k playback. The assistant is asking me to access HIGHLIGHT RECOVERY in the MADVR settings under HDR, but I can’t do that apparently without libmaris.dl which I don’t think is included in your bundle. Can you either include it in the next update or tell me how to locate it? I haven’t been able to find it so far. Thanks.
nevermind fixed
I got a OLED monitor with FreeSync & G-SYNC Compatible, VRR and HDR.
According to the site displayspecifications it is a 10bit but on the madVR identification tab it says 8bit?! is madVR correct?
Also does windows 11 HDR option need to be enable to play HDR videos? and if the videos I play are non-HDR should I set up the madVR HDR configuration according to the guide OR just select ‘let madVR decide’ ?
Another thing I wanna ask is if I really need to ”list all display modes madVR may switch to” or considering the specs of my monitor I can leave this field blank?
The display is probably 8-bit + FRC.
Windows HDR isn’t needed to be on to use HDR.
If your monitor has good HDR implementation, choose ‘passthrough HDR to display’. If it doesn’t, then choose ‘tone map HDR using pixel shaders’ option. But if only RTX 5070 Ti, the ‘compromise on HDR tone & gamut mapping accuracy’, ‘compromise on HDR luminance channel quality’ and ‘don’t measure HDF frame rate luminance’ options in ‘rendering —> trade quality for performance’ section should be enabled.
You can leave the ‘list all display modes madVR may switch to’ field empty if you do not use the refresh rate switcher.
”8-bit + FRC” does this mean I should select 8bit or 10bit on the options?
I got a LG 34GS95QE WOLED is it good enought to use ‘passthrough HDR to display’?
Also this monitor has a non-standard RWBG pixel layout , does it matter?
Just use 8-bit, and the pixel layout doesn’t really matter.
A glance from Google says that it is an HDR400 monitor. If that’s the case, use tone mapping via pixel shaders.
Many people have non-standard resolution monitors these days.
I got a ultrawide monitor (3440×1440) it’s not exactly 4k but it’s above FullHD and during the setup I only see FullHD and 4K presets so which preset should I select in this case?
Use the 4K preset of your choosing. I do that with my ultrawidescreen too.
Thx
I’m now a little confused with the LAV Audio, Splitter and Video configurations.
The guide here looks outdated and doesn’t explain it clearly.
What I assume:
– for the Splitter I should leave it as is.
– for the Audio I should just enable the ‘Mixing’.
– for the video I do not know which hardware decoder is the best nor if I should select any software deinterlacing algorithm from the dropdown list or just disable it.
running windows 11 here with AMD Ryzen 9 5950X and NVIDIA 5070 TI
For LAV Video Decoder, the deinterlacer has already been enabled at the video decoder level since sometime last year because GPU-level deinterlacers has become unreliable over the years. For video decoding method, you just choose whatever method that suits you, although if you have any AMD/Intel CPUs from the last 3 generations or so, you can probably get away with software decoding even with low-end models. As for the Splitter and Audo decoder, it is as you say.
Software Deinterlacing is ”BobWeaver” by default, should I just select ”no software deinterlacing” instead?
I always though hardware decoder was better but if I can get away with software decoding then the hardware decoder should be selected to ”none” ?
You can choose any deinterlacers in the video decoder, and you should choose one with an RTX 5070 Ti. My testing with similar RTX 5090 did not demonstrate good results with the GPU deinterlacers.
With that CPU, you can just use software decoding, the result should be more consistent. nVidia drivers are not the same quality as it is in years past.
getting message installing new update that potplayer dll is modified or hacked
Is this during installation or using PotPlayer?
yes
If it during installation, manually uninstall LAVFilters first. Then delete C:\Program Files (x86)\LAV Filters. Then reinstall.
thanks
Running high end NVIDIA GTX 5070 card and Denon AVR 4700h. Have bts dots HD and true HD enabled in LAVaudio setup. For other audio what default audio would you recommend setting in preferences?
DTS, DTS-HD and TrueHD
You can just enable the formats you wanted to use that is supported by the receiver.
PotPlayer says there’s an update (version 260114)(1.7.22774)). Can I update the player alone without effecting the LAV filters that were installed in your last update bundle?
You should download the portable version of the new PotPlayer and then extract its content into C:\Program Files (x86)\LAV Filters\x64\PotPlayer folder. Very important for you to delete the old zuikaku.exe and then rename the newer PotPlayer64.exe to it.
dont see portable version on their site
Check out videohelp page for PotPlayer
Hey ranpha, so sorry to hogging up your comment section but I wasn’t sure where to ask for help.
I’m having a issue with VRR flickering from any videos that I play on my new OLED monitor. The monitor in question is Gigabyte MO27Q28G (1440p, OLED, G-sync enabled, HDR disabled). It happens to any videos that I play from 1080p to 4k.
Is there a setting that I should be turning on/off from madVR?
I forgot to mention the display is 27″ 280Hz refresh rate.
Try disabling it like in here? madVR did not support VFR/VRR.
Hmm I was looking for a solution without disabling VRR completely off. I’ll try to find solution to only disabled when PotPlayer is playing.
Regarding smooth motion option on madVR, do I still pick option 2 for my current display (280hz display playing 24fps anime videos)?
Unfortunately I don’t think it is possible to avoid flickering in madVR without disabling VRR. Try choosing MPC Video Renderer in ‘Pferences —> Video’ section and see if the same problem happens with it or not.
Hi. Not sure what keyboard shortcuts or settings I’ve accidentally activated but whenever I start the video in windowed mode, top bar/playlist/progress bar all disappears, just like I’m in fullscreen mode. They will only show up when I hover my mouse to their respective positions. Is there a way to revert this behaviour?
Try right-click the video are, go to ‘Skins –> On Screen Control –> Disable’.
Thank you. That fixed it.