

Shortlink of this post – http://wp.me/PrgSo-b1 (use this link in your forum/BBS/IRC/twitter/facebook etc. messages)
Alternative reading: same configuration with this page using PotPlayer – click here.
TABLE OF CONTENTS
CHANGELOG
INTRODUCTION
CHECKLIST
TUTORIAL
MISCELLANEOUS
CHANGELOG
21 September 2014 – Modified slightly the CUVID decoding method below to include the HEVC hybrid decoding method.
Also included: A detailed QuickSync headless mode setup. You do not need this if you use Windows 8 and has installed the latest drivers.
From 12 May 2014, the installer will always reset the MPC-HC settings. Existing users that wants to retain their custom settings should make a back-up of their settings by going to the ‘Miscellaneous’ section and clicking the ‘Export’ button, as shown below.

Troubleshooting:-
INTRODUCTION
When this guide was first written nearly three years ago, it exclusively focused on making GPU-accelerated video playback. Today’s update means that you can use MPC-HC to use a variety of GPU acceleration options, depending on the computer configuration that you have, and of course, your preferences. Not only that,you can use software decoding too if you wanted it.
Suggested hardware – with consideration of software decoding and usage of madVR.
Updated January 2018 - With the advent of 4K UHD HDR displays, UHD discs now rippable, madVR removing NNEDI3 from image upscaling section and SPECTRE + MELTDOWN fiasco, there is only one hardware combination that you should get, which is AMD Ryzen systems with nVidia GPUs.
Recommended baseline CPU: AMD Ryzen 5 1600X Processor (YD160XBCAEWOF).
Recommended Motherboard: ASRock X370 TAICHI Socket AM4/AMD X370/DDR4/Quad CrossFireX & SLI/SATA3&USB3.1/M.2/Wi-Fi/A&GbE/ATX Motherboard.
It is really hard for you to go wrong with these two, especially when playing 4K HEVC 10-bit videos in software mode using LAV Video Decoder 64-bit. No Intel until maybe three to five years from now.
As for GPUs, it depends whether you have a 4K display or not. Now assuming that you want a 4K display right now that is capable of HDR for watching videos, I suggest that you do not bother with 4K HDR computer monitors, and go straight to a big 4K UHD TV.
Example 4K UHD TV: LG Electronics OLED55E7P 55-Inch 4K Ultra HD Smart OLED TV (2017 Model).
The TV above is 55", 4K resolution and has HDR too. The size means you do not have to change Windows scaling to have a usable desktop.
GPU recommendation (high-end - 4K HDR display or not): ZOTAC GeForce GTX 1080 Ti AMP Edition 11GB GDDR5X 352-bit PCIe 3.0 Gaming Graphics Card VR Ready(ZT-P10810D-10P).
Regardless whether you have a 4K display or not, the best nVidia GPU recommended is a GTX 1080Ti like the one above. It supports HEVC 10-bit and VP9 hardware video decoding, and does HDR passthrough really well. Can really handle NGU in madVR to as long as you don't go overboard.
GPU recommendation (low-end - 4K HDR display): ZOTAC GeForce GTX 1050 Ti OC Edition 4GB GDDR5 Super Compact Gaming Graphics Card (ZT-P10510B-10L).
GPU recommendation (low-end - non-4K display or 4K non-HDR display ): ZOTAC GeForce GTX 1060 Mini, ZT-P10600A-10L, 6GB GDDR5 Super Compact VR Ready Gaming Graphics Card.
The GPU for displays not capable of HDR (GTX 1060) is more powerful than GPU for 4K HDR displays (GTX 1050Ti) because converting HDR to SDR via pixel shader operations is a quite costly operation in term of GPUI resources. These two can handle all relevant video codecs, but if you have a 4K display, you should choose the bottom-most madVR preset in the installer.
Lastly, try and get Windows 8.1 instead of Windows 10 or Windows 7.
CHECKLIST
Main Programs:-
- DirectX End-user Runtime June 2010 –This is a mandatory installation. You can install this via the LAV Filter Megamix installer below (requires a working Internet connection). If you already have this runtime installed (some games install this for you), there is no need to redownload this.
- Windows 7 SP1 Platform Update – Download here. For Windows 7 users, this package needs to be installed to use DirectX 11 features in madVR. Also can be installed via Windows Update (KB2670838).
- LAV Filters Megamix – Download the 64-bit version. Compile time: 9 July 2026. Build: ab7ca6d. Changes: Updated LAV Filters and PotPlayer builds
.
- Contains MPC-HC (and PotPlayer + MPDN), LAV Filters, madVR, AssFilterMod, XySubFilter (disabled by default) and xy-vsfilter (disabled by default). doom9 thread for LAV Filters. doom9 thread for madVR, doom9 thread for XySubFilter + xy-vsfilter, doom9 thread for AssFilterMod.
- DXVA Checker – Download from here. Provides information about your GPU video decoding capabilities.
- GPU-Z – Download from here. Provides general information about your GPU.
- CPU-Z – Download from here. Provides general information about your CPU.
- Driver Sweeper – Download from here. Clean up remnants of device drivers installations for clean reinstall.
Test files:-
- H.264 SD video clip with styled karaoke subtitles [MediaInfo] – The Melancholy of Haruhi Suzumiya NCED theme (Hare Hare Yukai) – download here.
- H.264 720p video clip with styled karaoke subtitles [MediaInfo] – Clannad NCED theme (Dango Daikazoku) – download here.
- H.264 1080p video clip with styled karaoke subtitles [MediaInfo] – AIR NCOP theme (Tori no Uta) – download here.
- H.264 1080p video clip with styled karaoke subtitles [MediaInfo] – Clannad After Story NCOP theme (Toki wo Kizamu Uta) – download here.
- H.264 1080p video clip with styled subtitles [MediaInfo] – Planet Earth: From Pole to Pole – download here.
- Optional test file for testing deinterlacing capabilities: H.264 1080i video clip [MediaInfo] – History Channel – Decoding the Past: Mysteries of the Freemasons – download here.
- Optional test file for testing splitter’s segment linking capabilities: 3x H.264 anamorphic 1080p video clips with styled subtitles [MediaInfo] – K-On!! episode 6 – download here.
- Optional test file to test H264 4K playback and scaling performance: 8-bit H.264 video clip with 125Mb bitrate [MediaInfo] 4k UDHTV LG Demo video – download here.
- Optional (animation) test file to test Hi10p decoding performance: H.264 1080p 10-bit video clip (no subtitles) [MediaInfo] Sentai Filmworks’ Angel Beats trailer – download here.
2-pass encode with 10000Kbps bit-rate, 16 reference frames and 8 b-frames. Visually lossless compared to the source Blu-ray, even with 50% size reduction. If you can play this file flawlessly, your system should be good enough to play 99.999% Hi10p videos that anime fansubs groups will encode in the future. Even Tenshi’s encodes. - Optional (real-life) test file to demonstrate Hi10p encoding efficiency: H.264 1080p 10-bit video clip (PGS subtitles) [MediaInfo] – Pirates of the Caribbean: At World’s End blooper reel – download here.
2-pass encode with saner settings: 3072Kbps bit-rate, 3 reference frames, 3 b-frames. Differences in visual quality between the encoded file and the source Blu-ray is pretty much negligible. This clip is more than 3 times longer than the Highschool of the Dead clip above, yet the differences in size is merely only 20MB. A massive 80% file reduction has been achieved from the source file, with no 80% quality reduction, or any need to downscale to lower resolutions either. - Optional test file to test HEVC 4K playback and scaling performance: 10-bit H.265 video clip (no subtites) [MediaInfo] Samsung SUHD demo video – Colorful Food – download here.
If you have any problems downloading the files, please make a comment below.
TUTORIAL
Jump to:-
Step 1 – Installation Stage
Step 2 – Choosing Your Preferred Decoding Method By Configuring LAV Video Decoder
Step 3 – Configuring LAV Splitter Source and LAV Audio Decoder
Step 4 – Configuring madVR
Step 1 – Installation Stage
Download the LAV Filters Megamix above and install it. Make sure you do not forgot to select MPC-HC in the screen below.
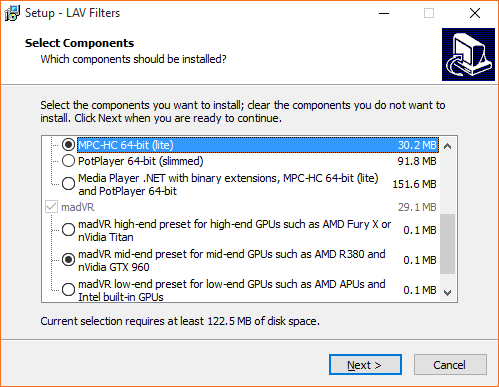
Then select a madVR profile that fits your preferences and GPU profile. If you enabled the ‘H.264 MVC 3D Decoder (extra download)’ option, you will need a working Internet connection to complete the installation process.
You will still need to go to madVR settings page and configure your display’s characteristics (‘devices —> ‘your-display-name-here’).
MPC-HC can now be started via ‘All Programs —> LAV Filters —> Media Player Classic HomeCinema’. Using Windows 8? It should be available somewhere in the Start Screen.
Step 2 – Choosing Your Preferred Decoding Method By Configuring LAV Video Decoder
It will be here where you will have to decide which decoding method from the list below that you want to use:-
- High performance software decoding mode.
- DXVA renderless decoding mode.
- CUDA decoding mode.
- Intel QuickSync decoding mode.
- Native DXVA decoding mode.
Go to ‘Start Menu —> All Programs —> LAV Filters —> LAV Video Configuration’ to bring up LAV Video Decoder property page. For Windows 8 users, the shortcut should be somewhere in the Metro Start page. LAV Video Decoder property page will appear and ready to be configured according to your preferred decoding method.
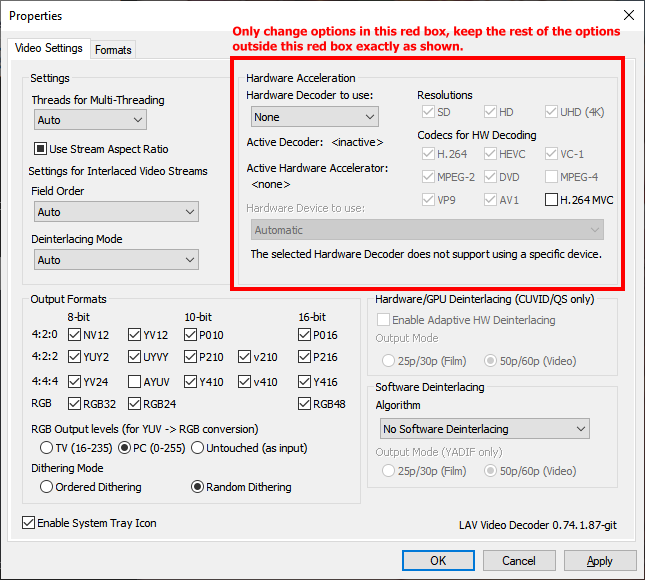
Method #1 – High performance software decoding mode.
Mainly used for Hi10p videos, and other video codecs if your GPU doesn’t support it. For best results, you need a fast dual-core CPU with minimum speed of 3Ghz. A quad-core CPU should at least have 2.5Ghz of speed at least.

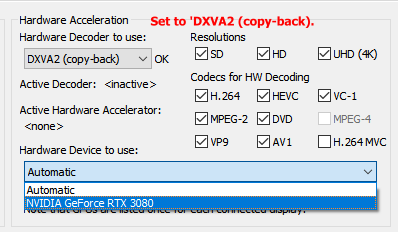
Method #2 – DXVA renderless decoding mode.
Works only in Windows Vista and later. Works best with nVidia GPUs, and also ATI GPU series that has UVD3 or later. ATI UVD2.x users may have to switch to EVR custom presenter. Doesn’t work on Hi10p videos and other unsupported video formats, and will fall into high performance software decoding mode when such files are played.
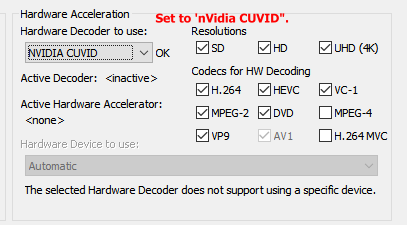
Method #3 – CUDA decoding mode (nVidia GPUs only).
note: Must use driver version 340.52, if your GPU is supported, if you want HEVC hybrid decoding support.
Doesn’t work on Hi10p videos and other unsupported video formats, and will fall into high performance software decoding mode when such files are played. Windows 10 users should avoid this method, and instead should use the DXVA renderless method above.
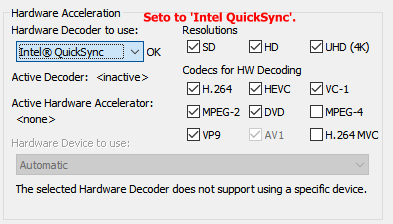
Method #4 – Intel QuickSync Decoding Mode.
You need an Intel SandyBridge/IvyBridge CPU that use the LGA1155 socket and a motherboard that did not use the P67 chipset. Therefore only motherboards with the B65, H61, Q67, H67, and Z68 chipsets can be used. All Series 7 motherboard chipsets will work. Windows 7 and later is recommended. Windows Vista is discouraged (no heterogenous GPU support), and Windows XP isn’t supported at all.
If you want to use QuickSync ASIC for decoding while using a discrete videocard for madVR, you will need Windows 7 or later. If you only have Windows 7, you need to enable the QuickSync headless mode by following the steps in this link. If you have Windows 8, you do not have to do so.
Always make sure that you are using the latest drivers available from Intel’s website, not the ones that comes from the motherboard manufacturer’ websites, or the CD. Older driver versions may cause the decoder to fail.
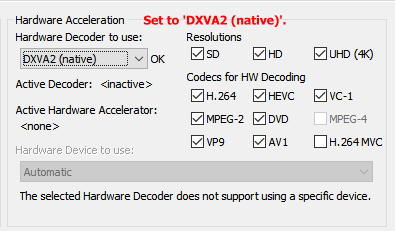
Method #5 – native DXVA decoding mode.
Works only in Windows Vista and later. Should only be used by owners of Intel G45 chipset, Clarkdale and Arrandale CPUs, ATI HD3xxx, HD4xxx and HD5xxx GPUs. But all other GPUs/iGPUs that can use QuickSync/CUVID/DXVA renderless decoding methods should also be able to use this mode. Doesn’t work on Hi10p videos and other unsupported video formats, and will fall into high performance software decoding mode when such files are played.
Click ‘Apply’ button to save your settings, then click the ‘OK’ button to close the property page.
Step 3 – Configuring LAV Splitter Source and LAV Audio Decoder
Go to ‘Start Menu —> All Programs —> LAV Filters —> LAV Splitter Configuration’ to bring up LAV Splitter property page. For Windows 8 users, the shortcut should be somewhere in the Metro Start page. ‘LAV Splitter’ property page will appear below.

Leave everything here exactly as shown above. You’re welcome to play around with automatic audio/subtitles track selection routine though to suit your needs. Verify that everything is in order, click ‘Apply’ and then click ‘OK’ to close the property page.
Go to ‘Start Menu —> All Programs —> LAV Filters —> LAV Audio Configuration’ to bring up LAV Audio Decoder property page. For Windows 8 users, the shortcut should be somewhere in the Metro Start page. ‘LAV Audio Decoder’ property page will appear below.

Enable any audio codec you want to bitstream here. If bitstreaming DTS-HD MA, do not enable ‘Use DTS-HD Framing for all DTS types’ unless your receiver needs it.
Go to the ‘Mixing’ tab and enable the ‘Enable Mixing’ option. Set the ‘Output Speaker Configuration’ option to match your speaker setup

For example, if you have a stereo speaker system, change the’Output Speaker Configuration’ option drop-down menu to use ‘Stereo’. Verify that everything is in order, click ‘Apply’ and then click ‘OK’ to close the property page.
Step 4 – Configuring madVR
Click here to read how to configure madVR.
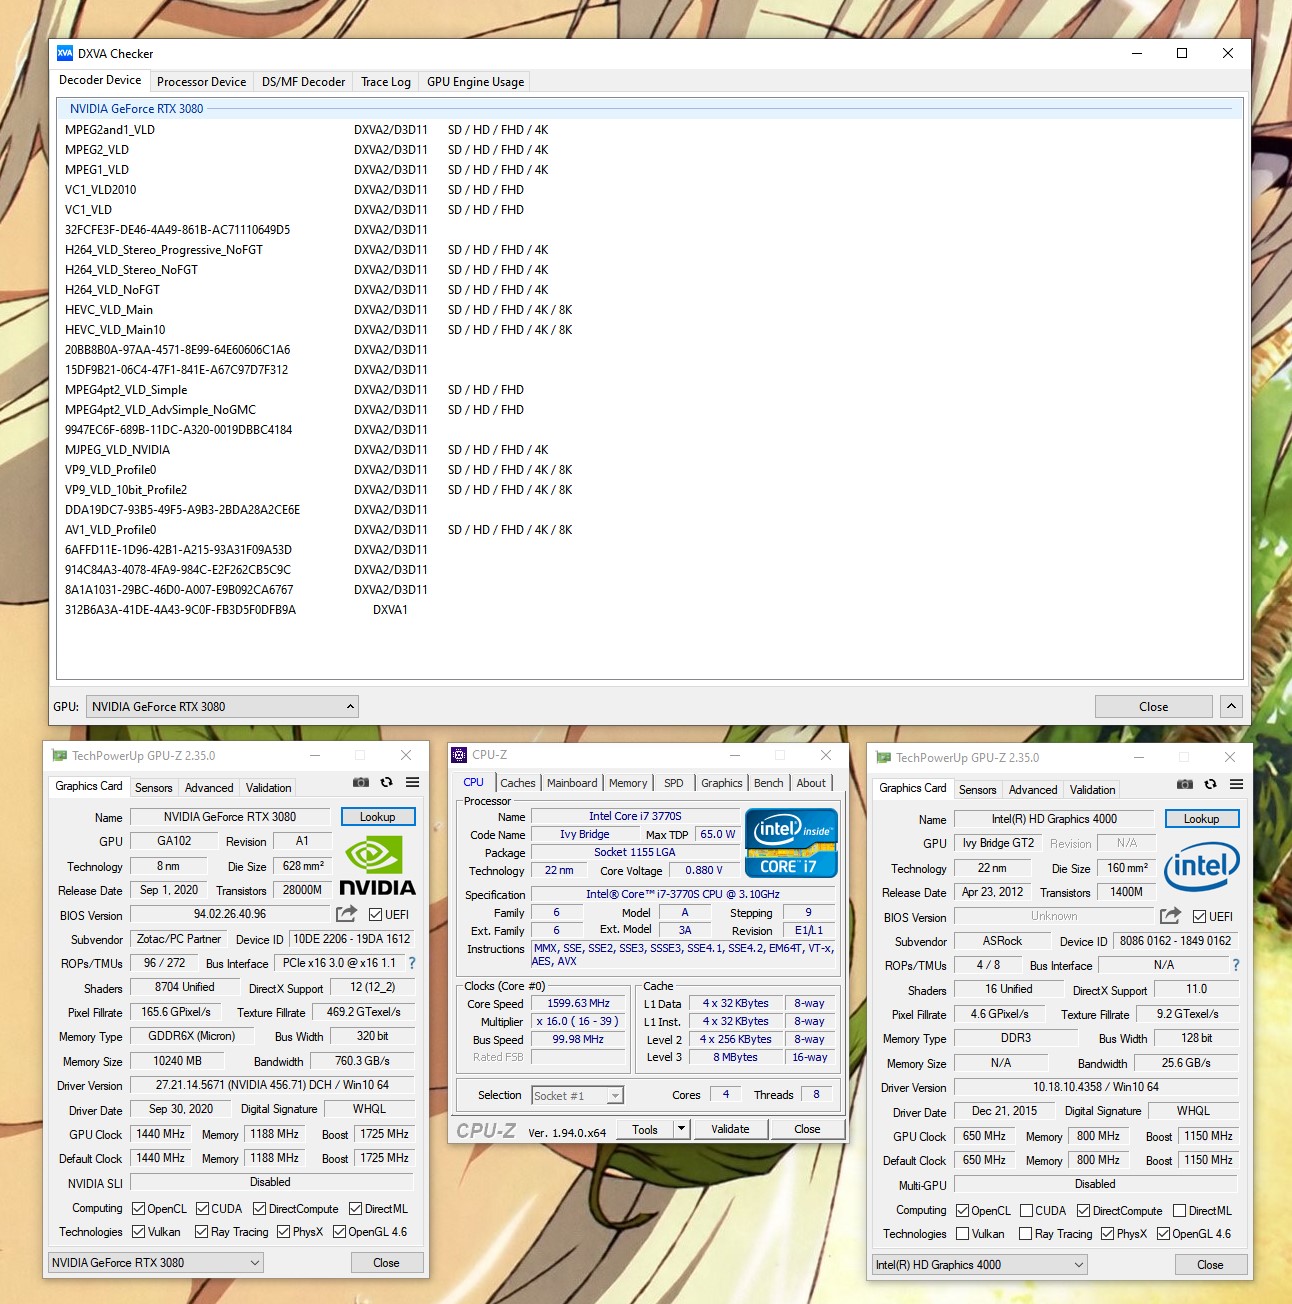
If you have any problems, make a comment below with the screenshots of your DXVA Checker, GPU-Z and CPU-Z results like in the example below.
MISCELLANEOUS
- With the removal of ffdshow raw video filter, if you want to deband your videos, you have to use JanWillem32 deband pixel shader script (which is included in the LAV Filters package above) or madVR. Those two methods need a reasonably powerful GPU to run effectively though. No iGPU like Intel HD4000 and AMD/nVidia solutions can handle it, and some models of low-end discrete GPU may have problems too.


Hello, i just want to report for your awareness. I have issue playing AV1 video on MPC-HC with Madvr high end preset. Install with 0.81 Build 329760f. Video play without any display. Just black screen but got audio. I try to find what the problem is and find out in MPC-HC internal filter all has been enable. This make video load with Internal Lav Filter with has been set to DXVA2 Native. I changing it to None or DXVA2 copy back make it work but still using internal Lav Filter. So i just disable all check box in MPC-HC Internal filter to play the video with external Lav Filter.
Btw do you have a more detailed breakdown of what changed between 0.81.0-2 and 0.81.0-1? I am noticing when switching from window mode to fullscreen for the first time of a a file I am getting a noticeable lag and more dropped frames than before. Also happens if I do the reverse by launching in fullscreen and switch to windowed for the first time a file is loaded. I am also dropping frames every time I pause/unpause. I know dropped frames is not unusual when pausing, but it was never this bad. It’s almost like the way frames are queued was changed.
My madvr settings should not have changed so I am thinking this has something to do with mph-hc or the LAV filters. MPH-HC is still being labeled as version 2.6.0 however I noticed that the render statistics display is (ctrl+j) displaying some statistics differently on this new build. If I can narrow down what changed I can see if it is a bug or if there is some new setting I need to change.
The biggest change in the past two builds is the updated madVR with the experimental tone-mapping feature. See the madVR page for the quick configuration process.
It should also fix problems with high refresh rates, high frame rate videos and HAGS/VRR.
If the videos you play has HDR, you are going to have performance problem unless you have at least an RTX 5070 Ti class GPU, especially if you also has high refresh rate display. See the madVR page for more details.
I only have a GTX 1060. I haven’t messed with madvr settings in years.
I read through your madVR page and if I’m not mistaken you are suggesting that I if you don’t have a RTX 5070 Ti class GPU to basically stop using madvr, correct?
I haven’t been keeping up with the MPC Video Renderer development, is that going to be a significant downgrade in terms of video quality?
I’m sorry I get so hung up on this stuff but I barely understand it after all these years.
No need to change video renderer if you can avoid playing HDR videos. If you can do so, staying with madVR is possible. Some of the bugfixes over the years-old stable madVR may cause extra GPU processing power, but not that much.
Dynamic tone mapping on the experimental madVR build is a GPU killer. Playing a certain HDR10 4K test file from Samsung with DXVA2 copyback decoding method and I already see 50% GPU utilization on an RTX 5090. Omniscient Viewpoint live action also takes about 30% GPU usage.
I will try to keep an eye out for HDR videos. But the video I was having issues with on the newest build was a Crunchyroll rip (Subsplease) so maybe something else is going on. I will try the new build with the MPC Video Renderer to see if the issue persists and try to find the cause if it does.
I was actually experimenting a bit with the MPC Video Renderer and discovered that it was handling a subtitle issue in the video [The Impatient Miyafuji Kantai] Luminous Witches – 12 [1080p][45D5B6A0] better than madvr was. Madvr was just freezing and skipping frames. MPC Video Renderer was also skipping frames but did so smoothly. Maybe it’s time to switch after.
Yep I just checked, no performance issues using the MPC Video Renderer on this new build. I’ll have to go through my madvr settings to see if something new is causing it because I don’t think it’s HDR related, not with a SubsPlease release.
Also I am noticing that the banding is so much worse using the MPC Video Renderer. I hope i can fix madvr
Apologies for spamming your comment section. I looked through the madvr settings and I don’t really see what could be the causing this performance issue. The only thing I thought was odd was that and that I want to ask you about was the hdr section. In your screenshot on your madvr page, the option for “let madvr decide” is blank. On my end, I’m seeing a bunch of options for stuff like TM curve, custom gauntlet, etc. Is that normal?
Those options are the same as the one in ‘tone map HDR using pixel shader’ option. If you do not have HDR-capable display, just choose ‘passthrough JDR to display’ and uncheck ‘send HDR metadata to the display’.
Even without the HDR feature, the experimental build will take a little more GPU resources than the latest stable version.
Unfortunately that didn’t help at all. I think I’ll just hang out on the older madvr version for as long as I can. Should be fine with CR rips and older releases for a while. Maybe I’ll figure out how to keep up with your other LAV filter and mpchc updates while keeping the older madvr version.
I think you may have uploaded the wrong build (Compile time: 20 February 2026. Build: b54d5ee). The downloaded installer is labeled LAVFilters-0.80.0-2-x64 (ver. 0.80.0.2). Your previous build was LAVFilters-0.81.0-1-x64 (ver. 0.81.0.1). Also this build downgrades MPC-HC to 2.4.3.6, a version released last May.
Damn, I have uploaded the file (LAVFilters-0.81.0-2-x64.exe) but made a mistake linking at the control panel. Should be fixed by now. Thanks.
The link you put up is 404ing. There is an extra “L” in the url. I got around it and downloaded the build by deleting the extra L, but just so you are aware.
https://skuld.ahmygoddess.net/LLAVFilters-0.81.0-2-x64.exe
Thanks for the information.
Did your LAV Filters Megamix always include a Microsoft Visual C++ 2015 Redistributable install? Just noticed this installed when I updated to your December 2025 build (f042faa) build. Never really noticed it before.
Yes a VC_redist.x64.exe file will be installed.
When i try to install 0.80 (September 24, 2025) version
It says libmfxhw64-v3 not found 404
Already hit retry button but still not working
Did you get in the installation package from the link below? There is no calls for a ‘libmfxhw64-v3’ file in the .iss file here.
Just heads up I believe the latest version of MPC that came with the 22 June 2025 megamix is not compatible with older versions of the mpc-hc-keys.reg that you get for saving key bind changes. I don’t know how hold, mine was from 2020 and I don’t think I lost anything of value – I think the only thing I had changed was binding the Z key to fullscreen. Good idea to make more up to date copy of your settings with all the new things that are getting added.
To add on, it looks this is because the mouse and key bind sections were separated and now need to be backed up via two different reg files. Also forgot to add, thank you for continue to update the Megamix
the test files seem to be offline
Damn, I can only fix this at the weekend.
Ok, should already be fixed by now.
Any chance of updating the xy-VSFilter + XySubFilter that are included in the megamix? https://github.com/pinterf/xy-VSFilter/releases
I’ve been using the internal sub renderer but I was having issue with typesetting on fansubs. I wanted to try VSFilter but it crashes MPC-hc. Apparent the latest version, v3.2.0.810, is supposed to fix that crash which has been happening since 3.2.0.804 (the one in the latest megamix is 3.2.0.806).
Right now I am using XySubFilter. I dropped XySubFilter for the internal renderer several years ago but I cannot remember why I switched.
Try this test build and see if the crash still happens or not.
No crashes using VSFilter with that test build. Tried standard CR rip and different fansub releases, opened the player directly via files and loaded files from within the player multiple times. No crashes.
Can you give me examples of the files that causes the crashes?
For me, any mkv files with loaded subtitles was causing the player to crash if VSFilter was selected as the sub renderer. So like https://nyaa.si/view/1891775 or any of the 1080p [SubsPlease] releases.
However like I said, there has been no crashes with the test build you asked me to test.