Last updated: 15 January 2018.
Shortlink: http://wp.me/PrgSo-vn
NOTE: Image scaling algorithms used in this page are of higher level than the high preset in the installer. More often than not, you only have to pick a preset that suits your GPU and display, and then only configure the ‘devices —> ‘your-display-name-here’ section while leaving the rest alone.
With the newest version of madVR, you can now configure the renderer offline without having to play a video, therefore you should go to ‘Start menu —> All Programs —> LAV Filters —> madVR Configuration’ to get started.
Make sure you choose the right kind of device for your display device. The Dell U2412M display is definitely a computer monitor, so I indicated it as such here.
To fully use the ‘zoom control’ function, only digital/CRT projector users would be able to use them to the fullest, therefore if you want to use it and has a projector and a ultra-widescreen screen, it is imperative that your projector is correctly specified explicitly.
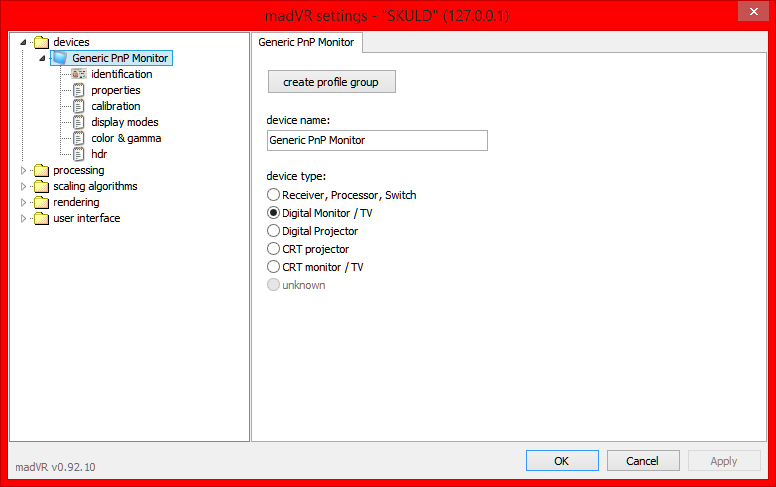
Go to ‘devices —> ‘your-display-name-here’ —> properties’ section, and you can see the madVR display property page as shown below.
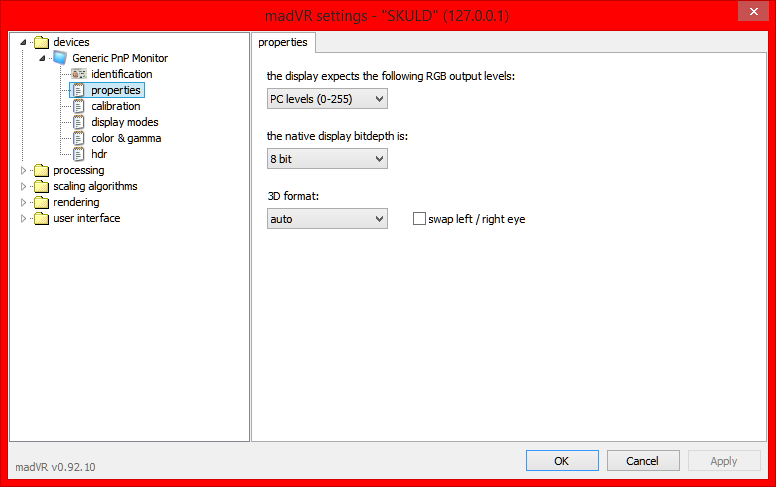
For the ‘the display expects the following RGB output levels’ option, choose the BTB/WTW levels your display are supposed to receive. Usually, computer displays expect ‘PC levels (0-255)’ while televisions expects ‘TV levels (16-235)’ but there is a growing numbers of TVs (usually flat-screens) that do expect PC levels too. If your display is one of those that support and expect custom luma levels, you can select the ‘custom levels…’ option and specify the BTB (black) and WTW (white) levels manually. Consult your display device documentation for the correct information. There is no right or wrong answers to this, but a mismatched configuration can be potentially devastating to the image quality.
For the ‘the native display bitdepth is’ option, if you have a twisted nematic (TN) LCD display, set this option to ‘6 bit’ or ‘7 bit’ (the latter is preferable especially if the monitor has already done dithering on its own). For owners of IPS/PVA computer LCD monitors, and also for those who use LCD/plasma TVs, set this option to ‘8 bit’. ’10-bit (or higher)’ option should be selected by owners of 10-bit displays like Dell U2410. Fullscreen exclusive mode should also be enabled at ‘rendering —> general settings’ section.
For users with 3D-capable displays, set the ‘3D format’ option to ‘auto’. Else, set it to ‘none’. Certain movies may have to enable the ‘swap left/right eye’ option.
Go to ‘devices —> ‘your-display-name-here’ —> calibration’ section, and here you will be able to calibrate the connected display device with yCMS or with your own 3Dlut file using ArgyllCMS (now the preferred way). You can learn how to do so here; a device like a colorimeter or a spectrophotometer is a must. This is optional. If you don’t calibrate, also see ‘devices —> ‘your-display-name-here’ —> color & gamma’ section explanation below. Disable the ‘disable GPU gamma ramps’ option if you don’t calibrate.

But if you calibrate:-
- choose ‘this display is already calibrated’ if you calibrate the display on the display level, usually by adjusting gamma, brigthtness and contrast with TV menu controls with the aid of a calibrating disc or a colorimeter or a spectrophotometer or anything like that. You will then have to tell madVR how you configure your display so that madVR can act appropriately.
- choose ‘calibrate this display by using yCMS’ if you want to calibrate the display using yCMS, at the GPU level. A colorimeter or a spectrophotometer is required. If you choose this option, also see ‘devices —> ‘your-display-name-here’ —> color & gamma’ section below.
- choose ‘calibrate this display by using an external 3Dlut file’ if you want madVR to reprogram the lookup table in your GPU from an external file generated from CMS programs like the stand-alone yCMS or dispcalGUI + ArgyllCMS.
Remember, if you calibrate your display using the latter two methods, your GPU must have at least 1GB of RAM. Lookup tables can take a huge amount of GPU memory.
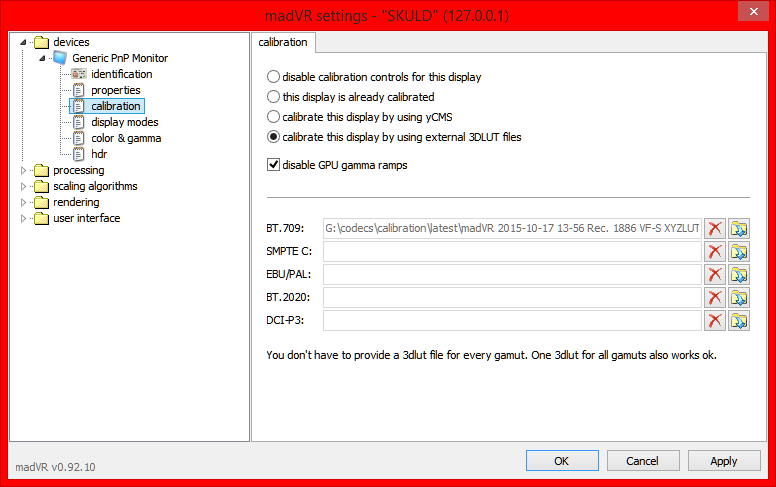
If you have a Dell U2412M A02 display, and want to have a go at using an external 3DLut in madVR, you can download an ‘Absolute Colorimetric with white point scaling’ 3DLut file here. For best results, you should also use this display profile file too, set it up in Windows’ Color Management Control Panel applet. Set your U2412M to use ‘Custom Color’ preset, then set R value to 89, G value to 94 and B value to 79. Set brightness value to 52 while keeping contrast at default 75.
Go to ‘devices —> ‘your-display-name-here’ —> display modes’ section, as shown below.
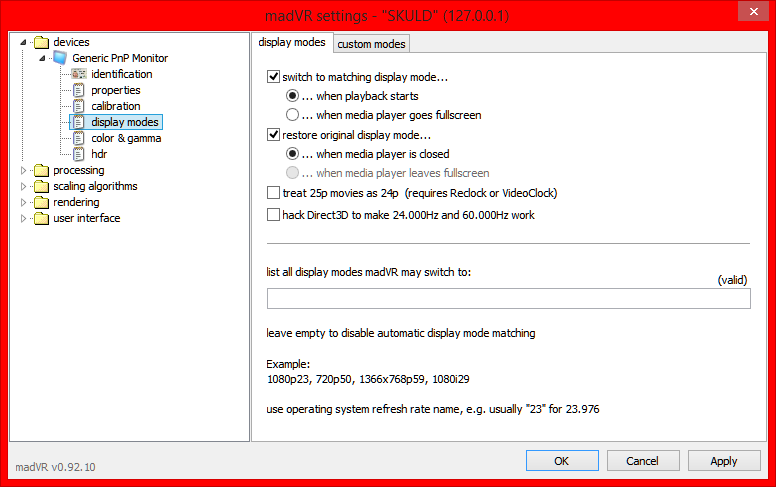
Enable ‘switch to matching display mode…’ option to enable the refresh rate changer (also change desktop resolutions if you asked it to), and then choose between the self-explanatory options of ‘… when playback starts’ or ‘… when media player goes fullscreen’ to suit your preferences. The latter is better if you use full-screen exclusive mode.
Enable ‘restore original display mode…’ if you want madVR to return the refresh rate (and resolution) to its original state. Choose between the self-explanatory options of ‘… when media player is closed’ or ‘… when media player leaves fullscreen’ to suit your preferences. The latter is better if you use full-screen exclusive mode.
If you watch movies that was ‘blessed’ with the PAL speedup treatment, enable the ‘treat 25p movies as 24p (requires Reclock or VideoClock)’ option. You need to set up the player to use Reclock Audio Renderer, and also enable ‘PAL SpeedDown (force to 24fps)’ option in Reclock property page as shown below. Most of the time, anime doesn’t need this enabled, unless you are watching European releases of licensed anime DVDs.
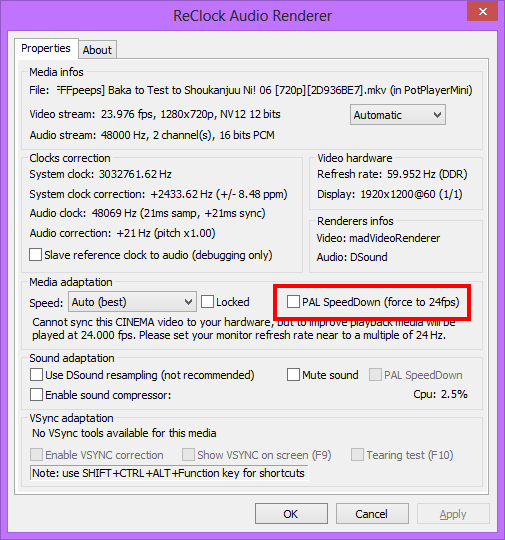
With the ‘list all displays mode madVR may switch to’ option, you can tell madVR to change your display device refresh rate (and also resolution) to closely match the frame rate of the playing video. To use this option, your display device must be able to use multiple refresh rates (see your display device documentation for more information). If your display can only do 60Hz (many LCD computer displays are guilty of this phenomenon), then just set this option empty, and use the smooth motion frame rate conversion feature described near the bottom of this page.
Go to ‘devices —> ‘your-display-name-here’ —> color & gamma’ section, and enable the ‘enable gamma processing’ option. This should only be done if you don’t enable calibration at the ‘devices —> ‘your-display-name-here’ —> calibration’ section, or calibrate the display using the ‘calibrate this display by using yCMS’ option.
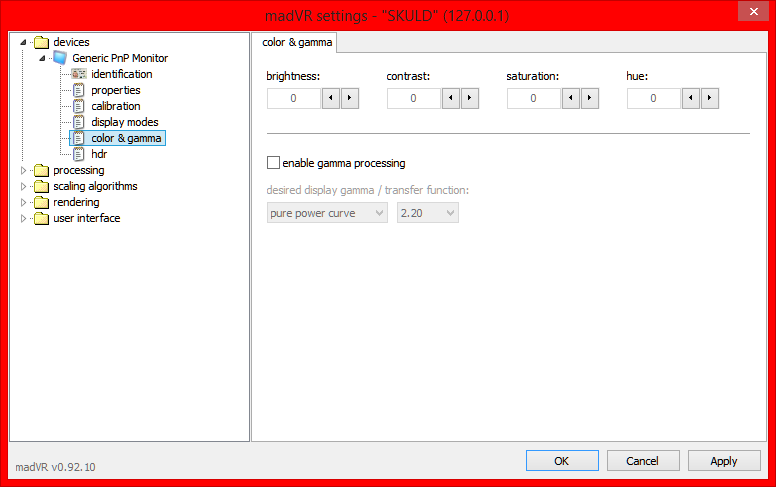
For the ‘desired display gamma/transfer function’ option, choose ‘pure power curve option’. The value should be between 2.20 to 2.40, depending on the ambient lighting in your room. The lower the lighting, the higher the number should be.
The ‘brightness’, ‘contrast’, ‘saturation’ and ‘hue’ values for the screen can also be adjusted here, and will only apply for the video that is playing. Usually, you shouldn’t be messing up with these values though, unless your display has defects in it.
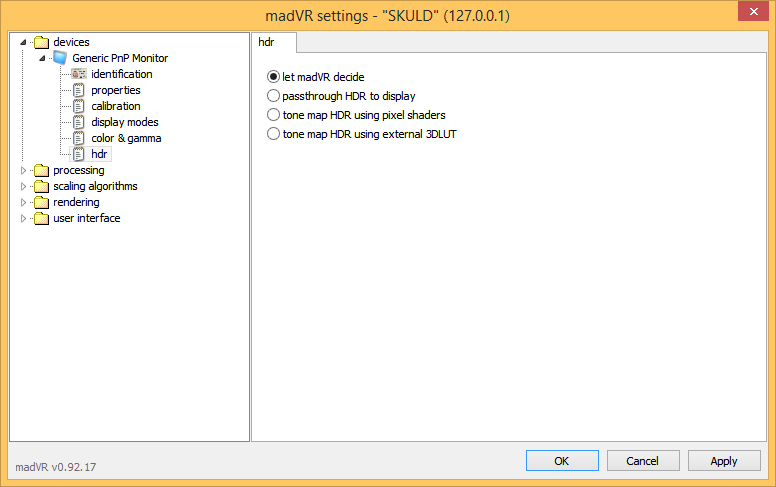
Go to ‘devices —> ‘your-display-name-here —> hdr’ to set up how HDR videos will be displayed in your display.
Now, how to configure this section depends on what kind of setup you have. Two things come to mind here: your GPU and whether you have HDR-capable display or not.
- If you have a GTX1070-class GPU:
- Go to ‘rendering —> trade quality for performance’ section and ensure that the ‘compromise on tone & gamut mapping accuracy’ option is unticked.
- Select ‘tone map HDR using pixel shader’ option as shown below:-
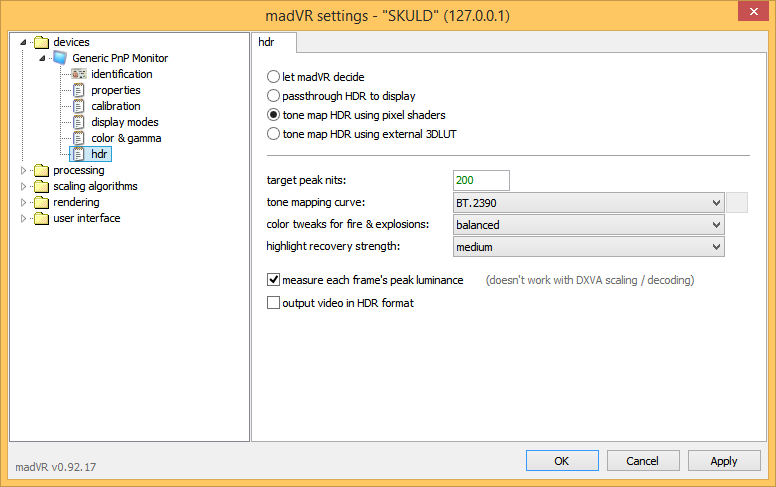
- For best results, measure your display brightness with a colorimeter and put the value in the ‘target peak nits’ field. If that’s not doable, set it to value between 150 to 200, depending on your taste.
- Set ‘highlight recover strength’ between medium to very high, depending on your GPU horsepower.
- Enable ‘measure each frame’s peak luminance’ option.
- If you have a GPU with horsepower below a GTX1070 and you don’t have an HDR-capable display.
- Go to ‘rendering —> trade quality for performance’ section and ensure that the ‘compromise on tone & gamut mapping accuracy’ option is ticked.
- Select ‘tone map HDR using pixel shader’ option.
- For best results, measure your display brightness with a colorimeter and put the value in the ‘target peak nits’ field. If that’s not doable, set it to value between 150 to 200, depending on your taste.
- Disable ‘measure each frame’s peak luminance’ option.
- If you have a GPU with horsepower below a GTX1070 and you have an HDR-capable display.
- Select ‘passthrough HDR to display’ option.
Demo of HDR mode switch.
If you have a projector and has specified it as such in the ‘devices —> ‘your-display-name-here’ —> properties’ section, a new ‘screen config’ section will emerge as shown below.
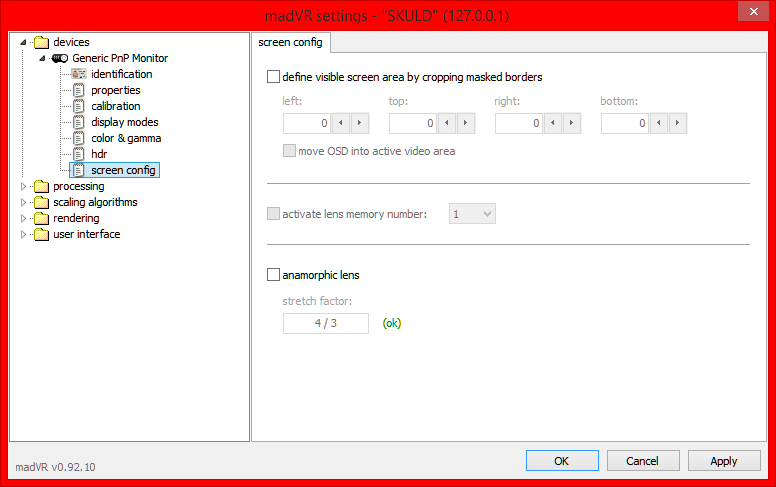
The ‘define visible screen area by cropping masked borders’ option, when enabled, will simulate a masking setup for those screens that doesn’t already have one. Margins of this virtual masking setup can also be configured manually. The ‘move OSD and subtitles into active video area’ option should be enabled, else the OSD (like the one that shows if you press CTRL – J) and subtitles will spill into the virtual masking setup.
The ‘activate lens memory number’ option allows madVR to choose what lens to use in certain Sony and JVC projector models.
The ‘anamorphic lens’ option simulates an anamorphic lens that can be used to stretch the active video area either horizontally (higher first number) or vertically (higher second number) towards the edge of the screen or towards the edge of the masking setup if one exists. Therefore the default ‘stretch factor’ of 4/3 will stretch a video horizontally.
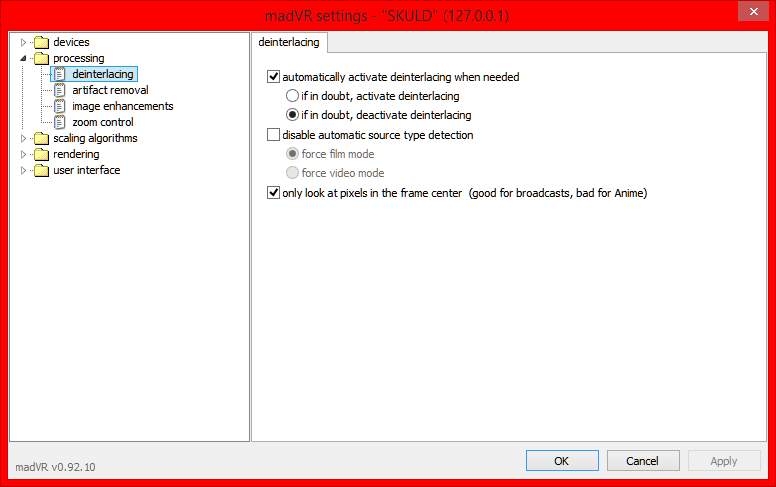
Go to ‘processing —> deinterlacing’ section, and set it exactly as shown below.
Go to ‘processing —> artifact removal’ section, and set it exactly as shown below.

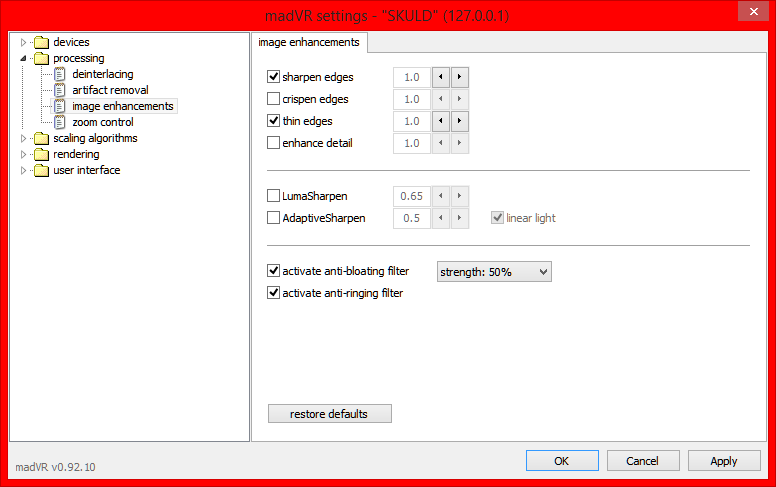
Go to ‘processing —> image enhancements’ section, and set it exactly as shown below.
The new feature of madVR 0.89 is the zoom control function, available at ‘processing —> zoom control’ section. This feature was aimed primarily for users that has 2.35:1 displays, usually projector owners who also desires to watch 1080p 2.35:1 Blu-ray movies without having to settle with letterbox black bars. Display should be explicitly set up as digital/CRT projectors.
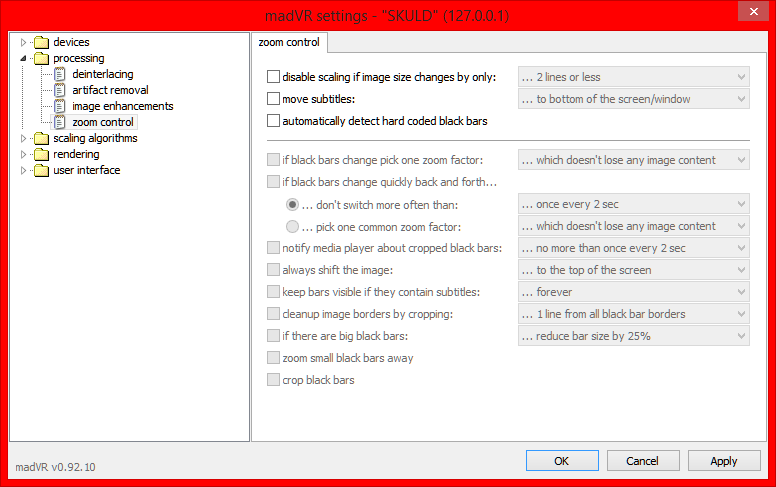
- The ‘disable scaling if image size changes by only:’ option should be disabled at all times.
- As for the ‘move subtitles:’ option, when you choose the ‘… the bottom of the screen/window’, certain subtitles’ types such as .srt or .txt will be re-positioned at the bottom of of the screen, and may also put it into letterboxes if any exists. Choosing the other option (… into active video area) is self-explanatory. Will also affect .ass subtitles lines that doesn’t have positional data embedded into it, so if you are Horriblesubs junkie consumer then you may consider disabling this option.
- If you want to use the new zoom control feature, enable the ‘automatically detect hard-coded black bars’ option.
What follows is the option that configure the ‘zoom control’ option.
- If black bars change pick one zoom factor – Certain movies, such as the infamous The Dark Knight, are presented with multiple aspect ratios, therefore this option configure what the zoom control should do when the aspect ratio of the movie image changes during playback. You can choose between two extremes; the first one is to ensure that no parts of the active video area has been zoomed out of the screen (… which doesn’t lose any image content) at the cost of occasional pillar boxes or letterboxes, the second one is to ensure that there are no black bars at all (… which doesn’t show any black bars) at the cost of losing video image area presentation, and some compromises between the two (the rest of the options). Choose according to your preferences.
- If black bars change quickly back and forth… – If aspect ratio of the active video area changes very often, usability problem can be mitigated by either reducing the zooming in/out rate at a certain specifiable level (… don’t switch more often than:) or to just follow the methods mentioned in the first option above (… pick one common zoom factor:). Again, this is a personal preference.
- notify media players about cropped black bars – Enable if you use MPC-HC, disable if you use PotPlayer, at least for now. If you do use this option, choose (… immediately after every change).
- always shift the image – this option is used depending on the masking setup setting your display has. Usually there is no need to use this though.
- keep bars visible if they contains subtitles – There are times when movie studios put hard-coded subtitles in the hard-coded black bars of a 1080p 2.35:1 video. This setting is supposed to fix those stupidity, either permanently for the whole playback (… forever) at the cost of seeing black bars or a specifiable period of time (the rest of the options).
- clean up image borders by – This option will crop a specifiable amount of line(s) from the active video area. Will clip slight area of video information at maximum setting.
- if there are big black bars – This option will remove all black letterbox and pillar box bars. May cause a huge amount of clipping of video information at maximum setting.
- zoom small black bars away – This option removes small black pillarbox bars that prevents the vertical edge of video image area from reaching the side of the display.
- crop black bar – This option will crop small amounts of black bars, if any exists, around the active video area.
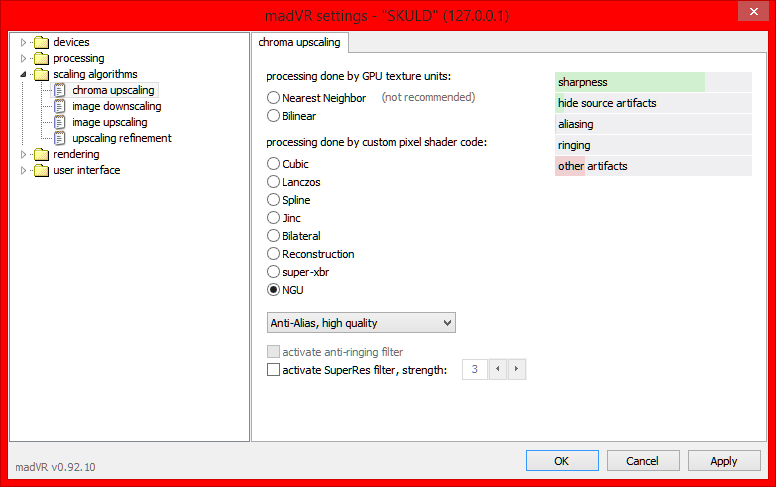
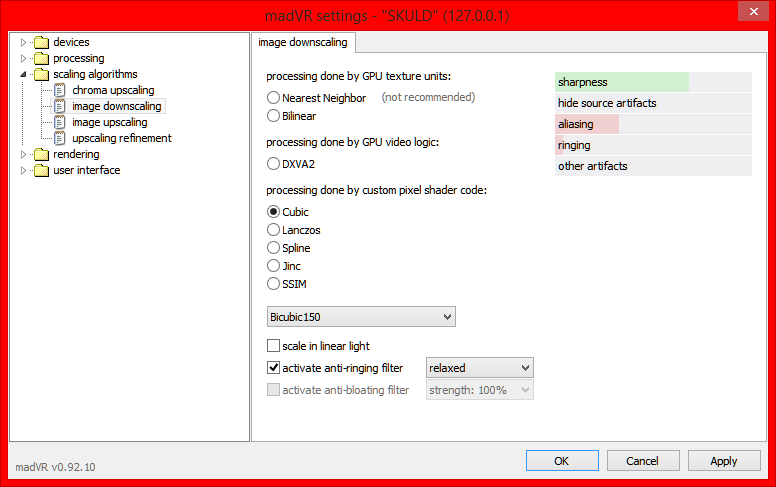
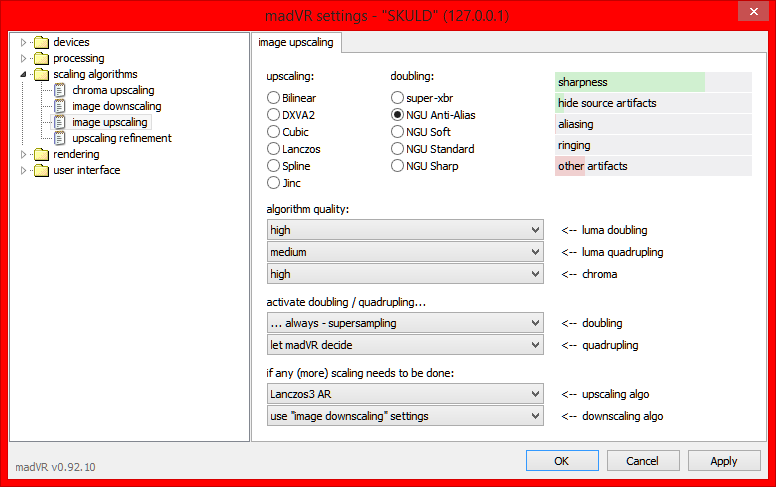
Go to ‘scaling algorithms —> chroma upscaling’ and ‘scaling algorithms —> image upscaling’ section, and you will found out that these two sections has nearly identical options. So many options, so the main question is ‘Which algorithm is the best one’?
The answer to that question lies in four factors:-
- What kind of display device you have and the resolution it is running on.
- What is the resolution of the videos you are playing on the said display device.
- What is the GPU you have.
- What is your own personal taste.
Let’s go to the first two factors first. If you have a FullHD (1080p) display (or higher) and mostly plays SD videos, you may want to choose algorithms that cause the least amount of ringing/haloing. The larger the gap between your display device resolution and the resolution of your video, the more pronounced the ringing problems will be, therefore, when you scoured TokyoTosho for more anime to download, always get the one that will match your display device resolution the closest. That’s why those green meters that changed every time you switch the upscaling algorithm can be used as a guide. If you watch most 720p HD materials on a 1080p device, you can get away with algorithms with quite a bit of ringing in it without you seeing any of them in actual playback.
There is another rule of thumb I always follow (but you don’t have to – see fourth factor below) when choosing upscaling algorithms: The sharpness of the algorithm used in chroma upscaling section should not exceed the sharpness of the algorithm used in the image upscaling section. It could be the same, but not exceed it.
Now to the GPU factor, the better processing power it has (in form of shader counts), the more flexibility you can have in choosing what algorithm you can use. If you only has a 8400GS for example, you won’t be able to use any of the heavy-hitting algorithms such as the spline resizer, especially if you display device resolution is big. A GPU like GTX1060 should be able to run any scaler without too much problems. If your GPU is lower than the recommended GTX650, or use integrated GPU, you should consider using the fixed-function bilinear scaler option or even the DXVA scaler. The ‘activate anti-ringing filter’ also takes significantly higher GPU usage, but allows aliasing to be reduced in spline, Lanczos and Jinc resizers.
Then to the most important fourth factor mentioned above – you own personal taste. Who am I to complain if you like plenty of ringing, as long as you can see it sharp? Conversely, who am I to complain if you like your video flat-looking and dull? In the end, you are the one who will decide how to watch your videos. This guide is merely a guide, not a holy book or something. Experiment until you got the quality that best pleases your eyes. Although of course you will still need the flexibility that a powerful GPU can give to you.
As of July 2017, the best scaler especially for anime is the NGU Anti-Alias.
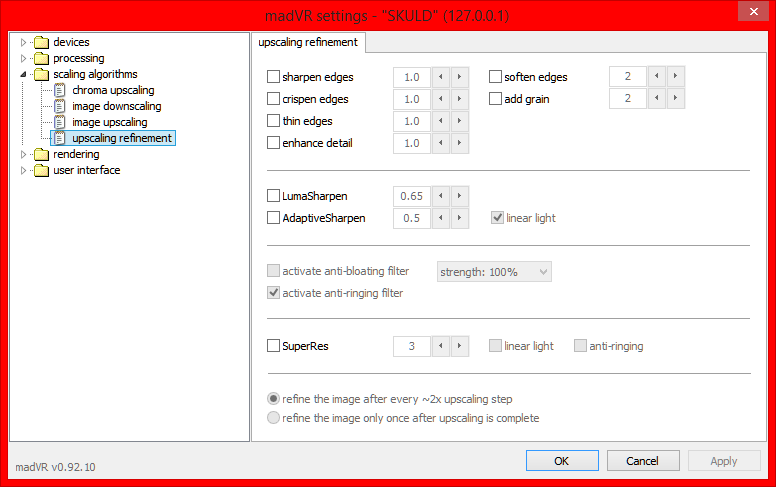
One madVR’s convenient feature is profiles, which you can set for the ‘processing’, ‘scaling algorithms’ and ‘rendering’ sections. Below is an example on how to configure madVR to switch ‘scaling algorithms’ profiles depending on arbitrary conditions you wanted.
Example: You want to use NNEDI3 for image doubling your anime videos, but you have a crappy GPU that isn’t a Titan Black or a R9 290x. Therefore you can only run luma and chroma NNEDI3 image doubling for SD videos, luma NNEDI3 image doubling for HD 720p videos, and nothing at all for Full HD 1080p videos.
Go to ‘scaling algorithm’ section, then click the ‘create profile group’ button.
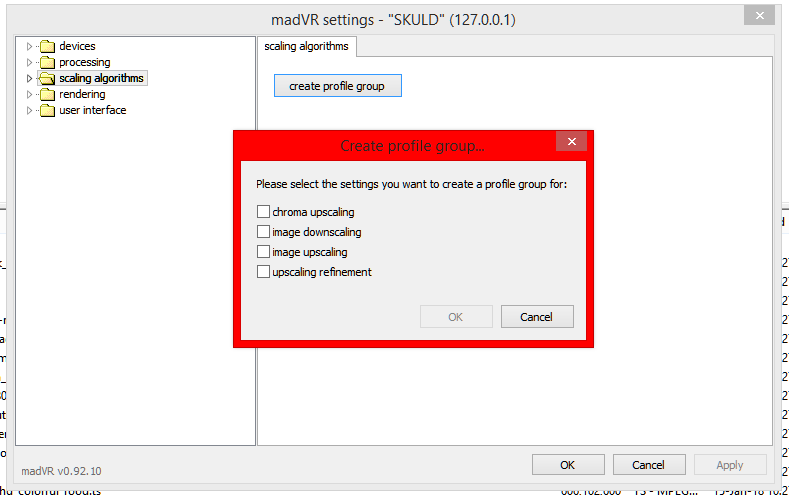
Tick all 4 options above options, and click the ‘OK’ button.
Then create three profiles, with the names of your choice (in the example above, I use “SD”, “HD” and “FullHD” respectively). Configure the ‘SD’ profile to use luma and chroma NNEDI3 image doubling, the ‘HD’ profile to use luma NNEDI3 image doubling only, while ‘FullHD’ profile to use no image doubling features at all. All three profiles use 3-tap Lanczos for image upscaling, bicubic sharpness for image downscaling. ‘SD’ and ‘HD’ profile use 3-tap Lanczos for chroma upscaling, while ‘FullHD’ profile use NNEDI3 32 neurons for chroma upscaling.
Then go back to the ‘scaling algorithm’ section, and configure madVR to automatically use the correct profile depending on the resolution of the video played. For the ‘SD’ profile, it will be activated if the video dimension has less than 1280 pixels in width AND less than 720 pixels in height, or if the video file has an .avi extension. The ‘HD’ profile will be activated if the video file name has the “720p” or “1280×720” strings in it. Some fansub groups does not tag their releases with the video resolution, therefore their group tag will be used instead to trigger the profile. The ‘FullHD’ profile will be activated if the video file name has the “1080p” or 1920×1080″ strings in it. The ‘FullHD’ profile will be automatically triggered too if the ‘SD’ and ‘HD’ profiles are not triggered earlier.
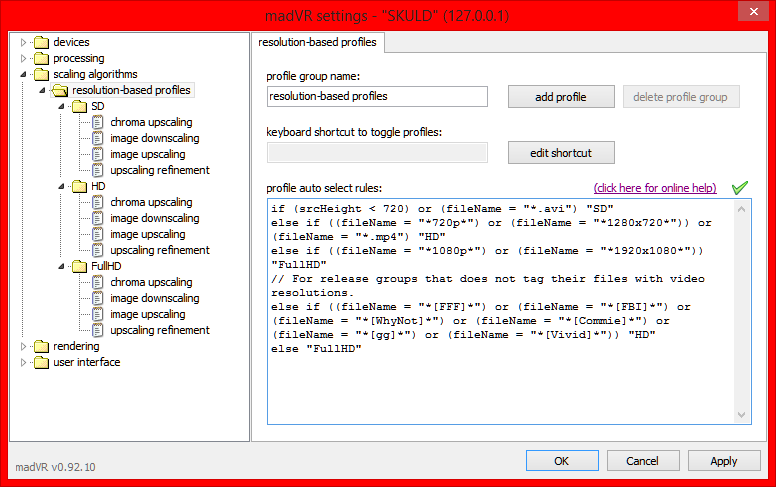
Copy-pasta-able example.
if (srcHeight < 720) or (fileName = "*.avi") "SD"
else if ((fileName = "*720p*") or (fileName = "*1280x720*")) or (fileName = "*.mp4") "HD"
else if ((fileName = "*1080p*") or (fileName = "*1920x1080*")) "FullHD"
// For release groups that does not tag their files with video resolutions.
else if ((fileName = "*[FFF]*") or (fileName = "*[FBI]*") or (fileName = "*[WhyNot]*") or (fileName = "*[Commie]*") or (fileName = "*[gg]*") or (fileName = "*[Vivid]*")) "HD"
else "FullHD"
List of arguments, operators, keywords et. al. is here.
Go to ‘rendering —> general settings’ section, and here is what you should do:-
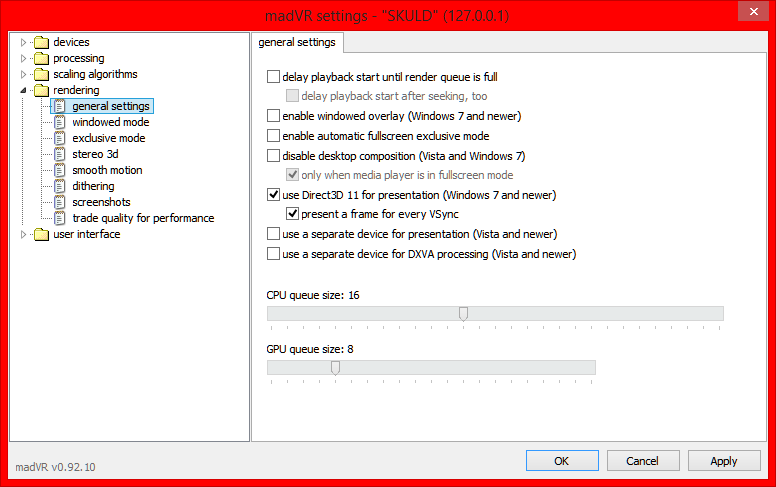
- Enable ‘delay playback start until render queue is full’ option.
- Disable the ‘delay playback start after seeking’ if you use GPU decoding, or else you will find delays when seeking in files. You should only enable it if you use software decoding AND have really fast CPU, or use the QuickSync decoding method. Do not enable these two options if you want Potplayer’s thumbnail preview feature to work correctly without seeing pauses during playback, or video playing automatically even if the video is paused manually.
- Disable ‘enable windowed overlay (Windows 7 and newer)’ option. Doesn’t work with AMD GPUs, and has been depreciated by the ‘present several frames in advance’ option in ‘rendering —> windowed mode settings’ section.
- If you want to use fullscreen exclusive mode, enable the ‘enable automatic fullscreen exclusive mode’ option. This is recommended if you are using Windows XP, or have Aero disabled in Windows Vista or 7, or if you have tearing problems. If you don’t have any problems with windowed mode playback, no need to enable this option. Also need to be enabled if you want to use 10-bit output in ‘devices —> ‘your-display-name-here’ —> properties’ section.
- The ‘disable desktop composition (Vista and Windows 7)’ should only be enabled if you want to use fullscreen exclusive mode, so that Aero doesn’t compete with madVR for v-sync handling. Doesn’t work in Windows 8.x unless you use full-screen exclusive mode.
- Enable the ‘use Direct3D 11 for presentation (Windows 7 or newer)’ option if you have the suitable GPU + OS combo. Also enable the ‘present a frame for every V-Sync’ option too. Leave the ‘use alternative glitch handling mode’ for troubleshooting purposes or if you have high refresh rate displays.
- Disable ‘use a separate device for presentation (Vista and newer)’ option. Enable this though if you want to use the ‘smooth motion frame rate conversion’ feature below.
- Disable ‘use a separate device for DXVA processing (Vista and newer)’ option.
- The CPU/GPU queues are now manually controlled, unlike the automated method used in 0.80. The default size of 16 (CPU queue size) and 8 (GPU queue size) should be OK.
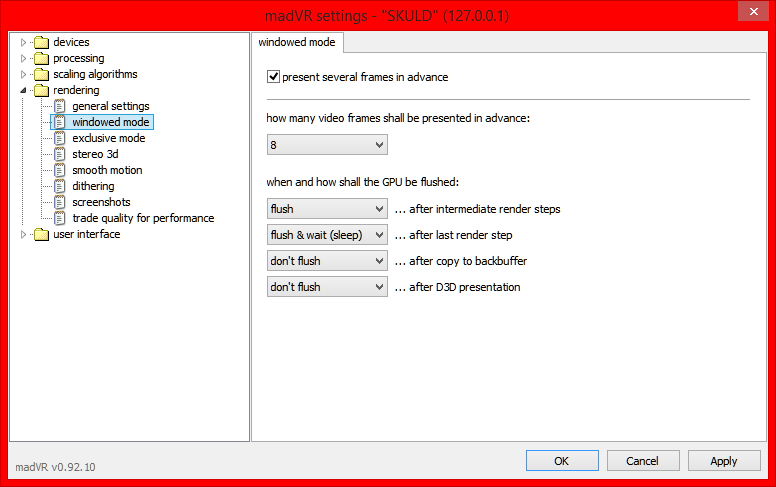
Go to ‘rendering —> windowed mode’ section as shown below. If you have Windows 7 or later, enable the ‘present several frames in advance’ option. ‘More often than not, the default setting below is good enough for most scenarios. If you see problems, might as well flush everything.
Go to ‘rendering —> exclusive mode’ section as shown below.

- Enable ‘show seek bar’ if you want to seek across the video timeline without exiting fullscreen exclusive mode.
- If you don’t want madVR to enter fullscreen exclusive mode immediately after the player goes fullscreen, enable the ‘delay switch to exclusive mode by 3 seconds’ option.
- The ‘present several frames in advance’ option should always be enabled if you want to use fullscreen exclusive mode. But the new fullscreen exclusive mode in 0.5x series and later can be problematic sometimes in certain configurations (like black screen problems), therefore you can revert to old 0.49<= fullscreen exclusive mode behavior by disabling this option.For ‘how many video frames shall be presented in advance’ option, set it to ‘8’ if you disable the ‘present several frames in advance’ option. If you enable that option, experiment with the values between 5 – 10. This option is best used only with AMD GPUs.
- The default flush settings as shown in the image above should work well in most scenarios. As usual, when in doubt, flush everything.
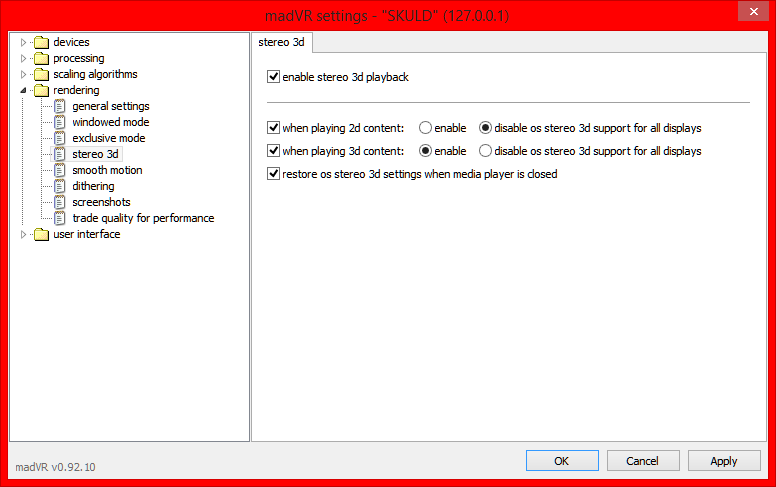
Go to ‘rendering —> stereo 3d’ section as shown below, and if you have a suitable 3D-capable display, configure this section exactly as shown below. This feature works only with Windows 8.1 and newer, and also require Direct3D 11 enabled in ‘rendering —> general settings’ section .
Go to ‘rendering —> smooth motion’ section as shown below, and enable the ‘enable smooth motion frame rate conversion’ option to enjoy judder-less video playback even if you have mismatched display refresh rate and video frame rate. You should not enable this if you are using something like SVP.
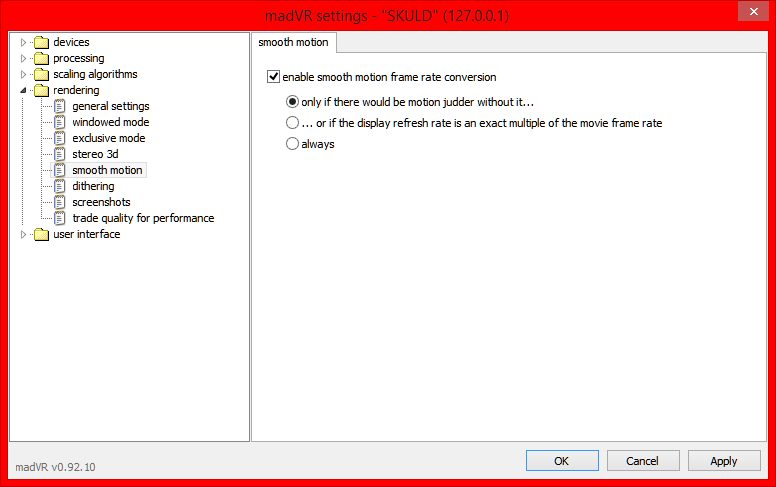
The first option: ‘only if there would be motion judder without it…’ should be enough for those 60Hz-only displays out there.
The second option: ‘…or if the display refresh rate is an exact multiple of the movie frame rate’ is useful for displays that are more flexible when it comes to refresh rate availability. Use this in conjunction of madVR’s refresh rate changer at ‘devices —> ‘your-display-name-here’ —> display modes’ mentioned above.
Do not use the third option (always) unless you really need it. Actually, I don’t really see any cases where you should enable this option.
This feature requires additional GPU powers, so take this in mind when choosing your GPU.
Go to ‘rendering —> dithering’ section as shown below, and enable the appropriate options as advised.
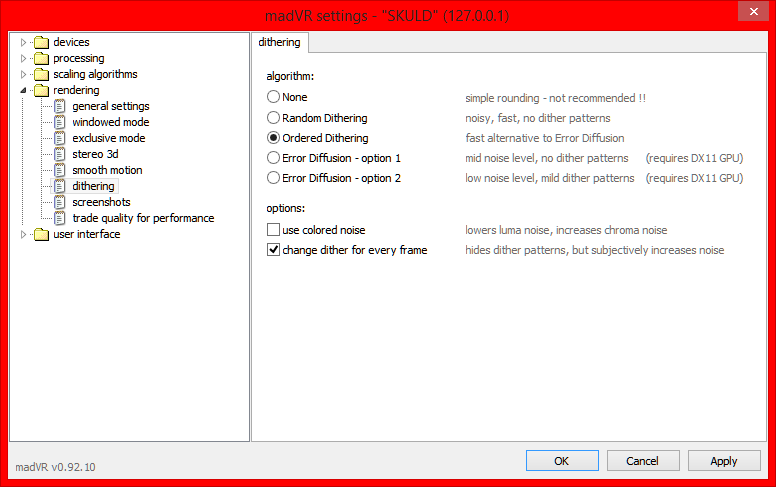
dithering/algorithm:-
- None: Do not choose this unless you have really crappy GPU. Choose this only for performance reasons because the quality is crap.
- Random dithering: Also do not choose this unless you have really crappy GPU. Choose this only for performance reasons.
- Ordered dithering: Choose this if your GPU is not crap but do not support DirectX 11, or if you still happened to use Windows XP.
- Error Diffusion – option 1: Choose this if you use Windows 7 or later, have a DirectX 11 discrete GPU with decent horsepower, and preferably use a monitor with 8-bit display bitdepth or higher.
- Error Diffusion – option 2: Choose this if you use Windows 7 or later, have a DirectX 11 discrete GPU with decent horsepower, and use a monitor with 6-bit display bitdepth.
dithering/options:-
- Use colored noise: Best used with the two error diffusion options above. Do not enable in conjunction with the first three dithering algorithms.
- change dither with every frame: Enable this option.
Go to ‘rendering —> screenshots’ as shown below. This feature allows madVR to assume the responsibility of taking video screenshots, replacing the feature in vcideo players like MPC-HC and PotPlayer.

- ‘create screenshots with a custom zoom factor’: allows you to specify the dimension of the screenshot image file, compared to the video original dimension. There are some ready-made options you can choose.
- ‘use high quality scaling algos – image upscaling’: If the screenshot image file is larger than video dimension, you can specify what image upscaling algorithm you can use to do the upscaling.
The rest of the options specifies which video player elements you want to include inside the screenshots.
Go to ‘rendering —> trade quality for performance’ section as shown below. Configure exactly as shown below. Enable all options if you have a low-end card. These settings, when enabled will reduce image quality but will also reduce the burdens placed on the GPU. Disable ‘lost BTB and WTW if it improves performance’ option if you use ‘custom levels…’ option in ‘devices —> ‘your-display-name-here’ —> properties’ section.

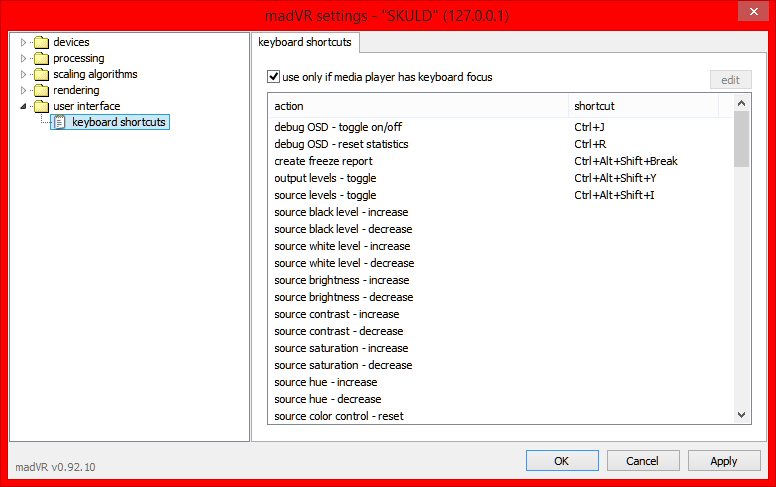
Go to ‘user interface —> keyboard shortcuts’ section and here you can assign custom shortcuts for many of madVR functions, so that you can change them without entering madVR options. Enable the ‘use only if media player has keyboard focus’ option so that those shortcuts only works when the media player has windows focus.
Click the ‘Apply’ button to save your changes, and click ‘OK’ to exit the property page and return to the video player. Configuration time is now finished.
Things you need:-
- Colorimeters or specthrophotometers that is supported by ArgyllCMS such as X-Rite i1 DisplayPro and ColorMunki Display. See full list here.
- ArgyllCMS 1.6.1 or later – http://www.argyllcms.com/downloadwin.html (32-bit version is enough). Unzip content to a folder of your choice.
- dispcalGUI 1.5.3.1 or later – dispcalgui.hoech.net. Download and install it.
Connect your calibration device and make sure the drivers are all working.
Go to ‘All Programs —> LAV Filters —> madVR Test Pattern Generator’ to start up the test chart display window. Enable the ‘stay on top’, ‘use full screen’, ‘disable VideoLUTs’ and ‘disable 3dlut’ options.

1) For those who has certain colorimeters as X-Rite i1 DisplayPro and ColorMunki Display, you can optionally download a .ccss correction file, by pressing the ‘globe’ button… (Internet access required.)

2) Pick the correct entry from the list, and the press the OK button.

3) The ‘Correction’ pulldown menu should now show the chosen .ccss correction file. If your colorimeter isn’t a X-Rite i1 DisplayPro or a ColorMunki Display, or there are no .ccss file for your meter + display combo, manually set this option to ‘Auto’.

4) Set the ‘Display’ pulldown menu to madVR.
5) Then click the ‘Calibration’ tab to go to the Calibration section.

6) Ensure that the ‘Interactive display adjustment’ option is unticked.
7) Set the ‘Tone curve’ pulldown menu to Rec. 1886.
8) Then click the ‘Profiling’ tab to go to the ‘Profiling’ section.
9) In the ‘Profiling’ section, click the multicolored square button to begin creating a new test chart.

10) Set all the fields in the red zone exactly as shown.

11) Click the ‘folder’ button, and then load the ‘Rec709.icm’ file from the ‘ref/’ subfolder of the ArgyllCMS folder.
12) Click the ‘Create testchart’ button to start the automated chart creation process.

13) Click the ‘Save As…’ button to save the newly created test chart in a folder that is convenient for your own access. My Documents folder is a very nice place to do it.
14) When asked whether to select the newly created testchart, click the ‘Select’ button.

15) Click the ‘X’ button to close the test chart editor window.

16) Back at the ‘Profiling’ section, click the ‘diskette’ button to save the working set folder in a folder that is convenient for your own access. My Documents folder is a very nice place to do it.

17) Then click the ‘3D LUT’ tab to go to the ‘3D LUT’ section.
18) In the ‘3D LUT’ section, ensure that the ‘Create 3D LUT after profiling’ check box is ticked.

19) Configure all the settings in the red zone exactly as shown.
20) Put your meter on the middle of your screen properly, then click the ‘Calibrate and Profile’ button. Calibration may take a while, so go take a nap or walk the dog while the process takes place.
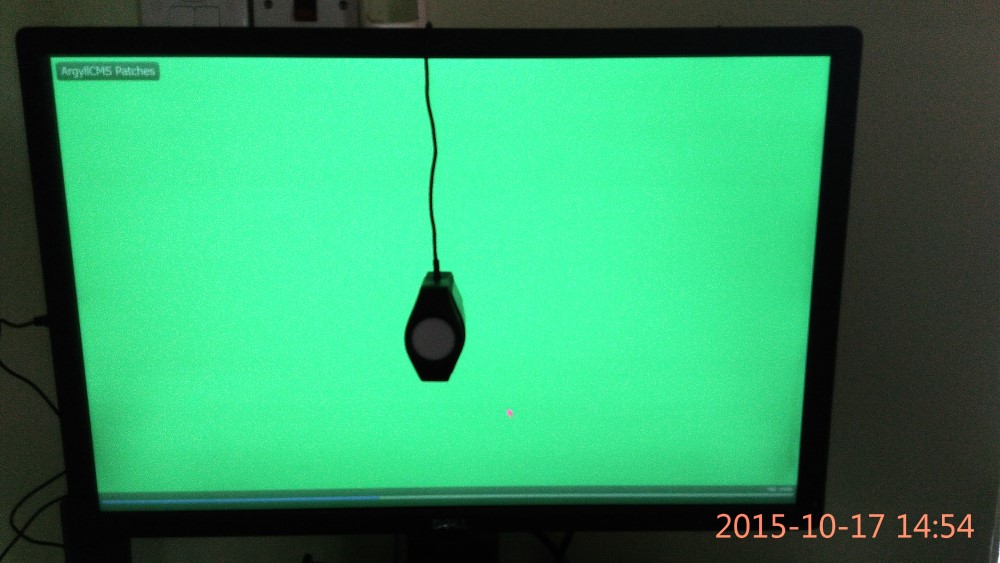

21) Press the ‘Cancel’ button when asked to install the newly created 3D LUT file.

You will now have a .3dlut file in the working folder you have specified in Step 16. You can use it in ‘devices —> ‘your-display-name-here’ —> calibration’ above, or in MPDN’s 3DLut renderscript.


Pingback: Media Player Classic – BE (MPC-BE) – Best settings – Update April 15, 2021 – psychicjordan's Blog
Pingback: MPC-BE + LAV Filters +madVR | Chris's Blog